
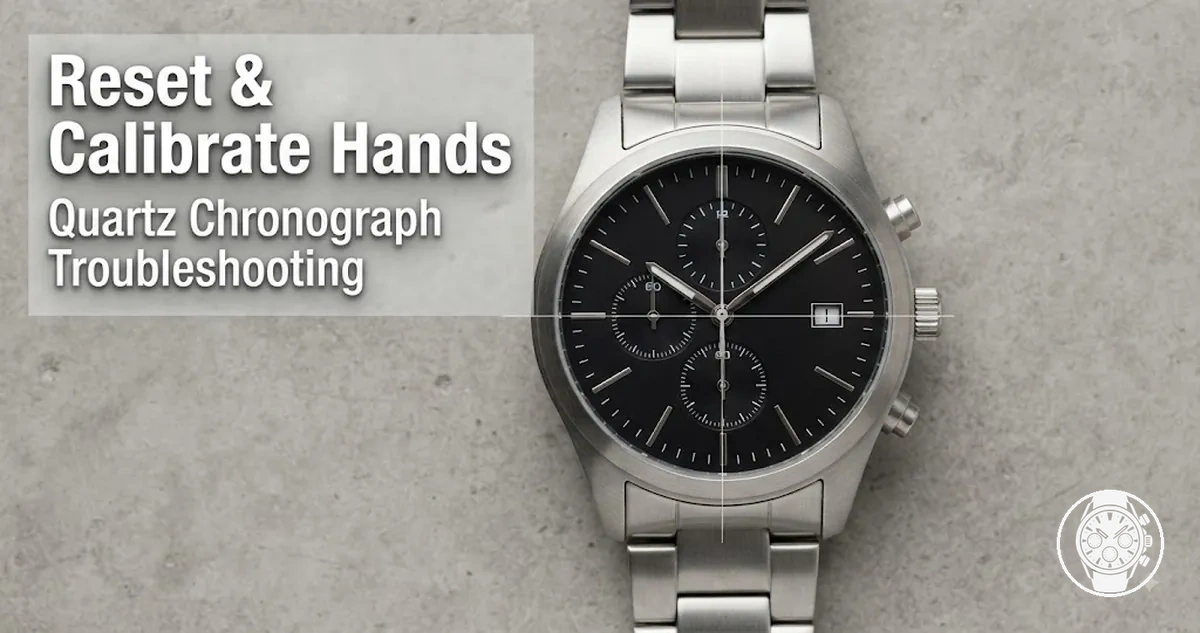
Men’s Quartz Chronograph Hand Reset and Zero Calibration
Men’s quartz chronograph hand reset and zero calibration correct chronograph hand alignment when stopwatch hands return to an incorrect zero position after reset. The process focuses on aligning chronograph hands and subdial hands with their intended zero markers rather than changing normal timekeeping accuracy. The exact reset method depends on the quartz chronograph movement, crown position, and pusher controls, so model variation must be considered before any calibration attempt.
The symptom identifies a hand alignment issue, but it does not by itself confirm a damaged movement or a required repair.
A misaligned chronograph hand is a display alignment symptom where a stopwatch hand or subdial hand stops away from its reset position after the chronograph function is cleared. The symptom identifies a hand alignment issue, but it does not by itself confirm a damaged movement or a required repair. According to the International Organization for Standardization (ISO), a chronograph is a time-measuring instrument with a stopwatch function, which separates the timing display from the basic time display function.
Chronograph hands and normal timekeeping hands have different roles.
Chronograph hands and normal timekeeping hands have different roles. The chronograph seconds hand, minute counter hands, and other stopwatch displays respond to chronograph controls, while hour, minute, and running seconds hands show normal time. A reset issue can affect the chronograph display without changing the accuracy of the normal timekeeping display.
Before using any calibration function, identify the symptom and the related controls.
Before using any calibration function, identify the symptom and the related controls. Check whether the same hand repeatedly returns to the same incorrect position, whether the crown position matches the movement instructions, and whether the pushers respond as expected. A universal pusher sequence cannot be applied to every men’s quartz chronograph because calibration controls differ by movement design and model variation.

- Chronograph seconds hand: Check whether the central stopwatch hand repeatedly returns away from the 12 o’clock marker after reset. A consistent offset indicates a zero-position alignment condition.
- Subdial hands: Check whether chronograph subdial hands return to their zero markers. Confirm that the subdial is a chronograph counter because some subdials display other functions, such as running seconds or time zones.
- Crown position: Verify the required crown position before calibration because the available reset controls can change according to movement design.
- Pushers: Confirm the pusher response before adjustment. Pushers may enter calibration mode or operate chronograph functions differently depending on the movement.
- Stop signals: If the hands move erratically, fail to respond consistently, or show symptoms beyond a repeatable alignment issue, broader troubleshooting may be required.
For example, if a central chronograph seconds hand returns to the 1 o’clock marker instead of the 12 o’clock marker after every reset, the observable condition is an off-zero hand alignment problem. The practical action is to identify the movement-specific calibration method rather than assuming the same reset procedure applies to every men’s quartz chronograph.
Table of Contents
What Chronograph Hand Misalignment Means
Chronograph hand misalignment is a condition where a chronograph stopwatch hand or subdial hand does not return to its intended zero position after the chronograph reset function is used. The condition describes a display alignment issue within the chronograph function, not automatically a problem with the watch’s normal timekeeping display. The zero position acts as the visual reference point for checking chronograph hand alignment.
The exact hand layout and reset behaviour depend on the movement design and model variation.
Chronograph hand misalignment affects chronograph seconds hands, minute counter hands, or relevant subdial hands when they stop away from their expected reset position. A men’s quartz chronograph watches display can show an off-zero hand while the hour, minute, and running seconds hands continue their separate timekeeping roles. The exact hand layout and reset behaviour depend on the movement design and model variation.
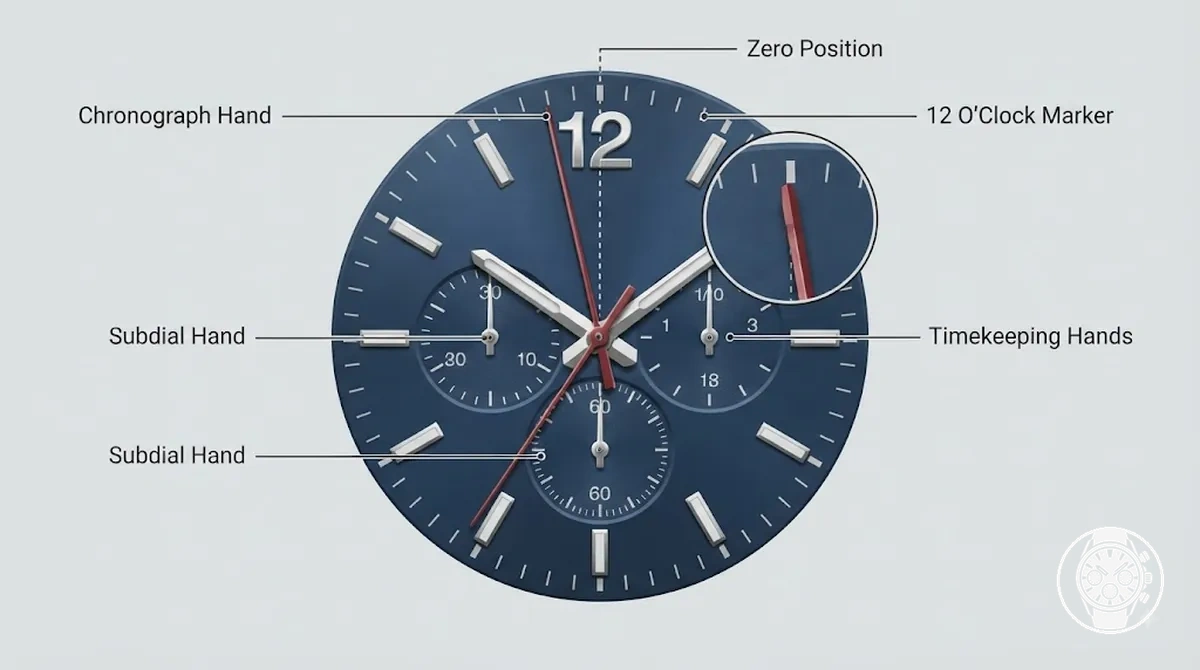
Chronograph hand misalignment does not necessarily indicate that the entire watch has inaccurate timekeeping. The issue concerns the alignment of the stopwatch display, while normal timekeeping hands measure a different function. For example, a chronograph seconds hand that repeatedly returns to the 1 o’clock marker instead of the 12 o’clock marker shows an off-zero display alignment condition, but this visible position alone does not measure the accuracy of the timekeeping mechanism.
The comparison below clarifies how different hand types relate to reset alignment and normal time display.
The comparison below clarifies how different hand types relate to reset alignment and normal time display.
| Issue type | What it usually affects |
|---|---|
| Chronograph seconds hand | Stopwatch display alignment and return position after the chronograph reset function. |
| Subdial hand | Chronograph counter alignment when the subdial represents a resettable timing function. |
| Timekeeping hands | Hour, minute, or running seconds display rather than chronograph reset alignment. |
Chronograph Stopwatch Hands Versus Normal Timekeeping Hands
The chronograph stopwatch hand and the normal timekeeping hand have different functions, controls, and reset behaviours. The chronograph stopwatch hand responds to the chronograph pusher and returns according to the chronograph reset behaviour of the movement. The normal timekeeping hand shows regular time display information and is controlled through the crown-based time-setting function rather than chronograph reset controls.
The chronograph stopwatch hand and the normal timekeeping hand have different functions, controls, and reset behaviours.
A common confusion occurs when a running seconds hand is mistaken for a chronograph stopwatch hand because both can move around the dial. For example, a running seconds hand may continue moving during normal operation, while a chronograph stopwatch hand responds to the pusher input and returns to its reset position when the chronograph function is stopped and reset. The distinction helps identify whether a visible hand position relates to chronograph display alignment or normal time display.
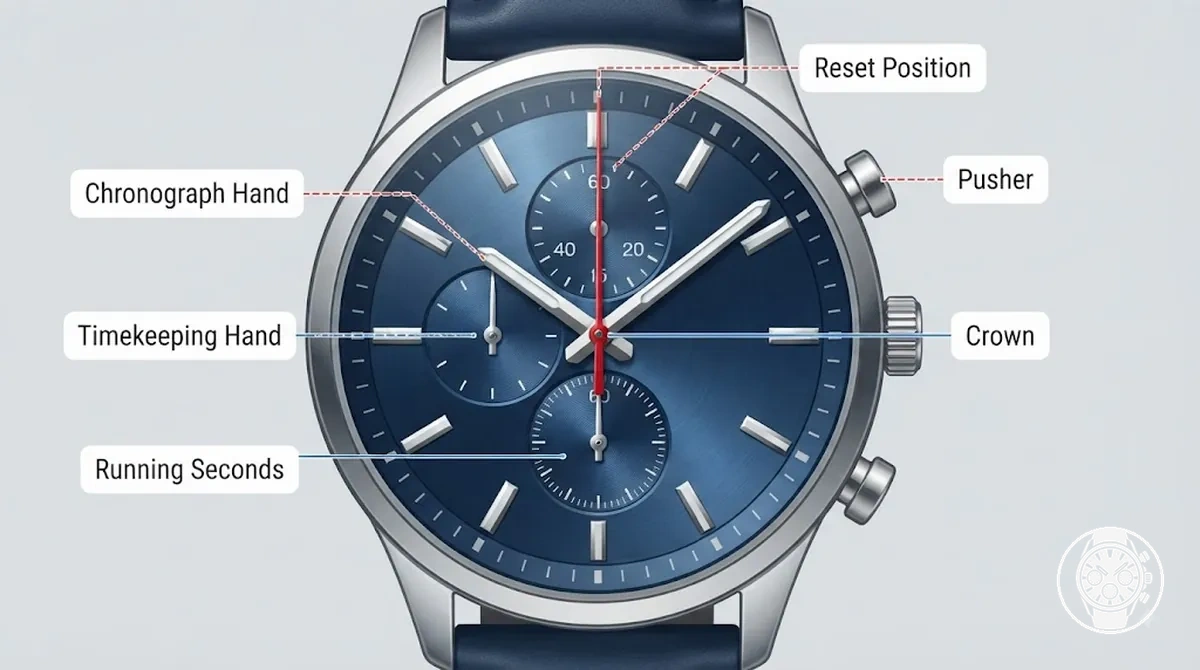
The comparison below shows how hand type, control input, reset behavior, and adjustment relevance differ to prevent incorrect resetting.
| Hand type | Controlled by | Reset behavior | Calibration relevance |
|---|---|---|---|
| Chronograph seconds hand | Chronograph pusher control | Returns to the zero position after chronograph reset behavior according to the movement design. | Relevant for chronograph display alignment. |
| Chronograph subdial hand | Chronograph controls when the subdial represents a timing counter | Returns according to the specific subdial function and movement configuration. | Relevant when the subdial is a resettable chronograph display. |
| Normal timekeeping hand | Crown-based time-setting controls and regular time display operation | Does not use chronograph reset behavior. | Not a target for chronograph hand alignment adjustment. |
Zero Position and 12 O’Clock Alignment
The zero position is the reference point where a chronograph hand should return after reset, and 12 o’clock alignment is a common visual reference when the watch design places the reset marker at that location. The central seconds hand, minute counter, and subdial hand can have different reset relevance depending on their function. The correct marker position is therefore determined by the specific chronograph display and movement design.
The correct marker position is therefore determined by the specific chronograph display and movement design.
To check visual alignment, observe where the chronograph hand returns after reset and compare it with the intended zero marker. A central seconds hand that stops away from the 12 o’clock marker may indicate a display alignment issue, while a subdial hand should only be evaluated if that subdial represents a resettable chronograph counter. Some subdials display running seconds or a 24-hour indication, so they are not necessarily part of chronograph reset behavior.
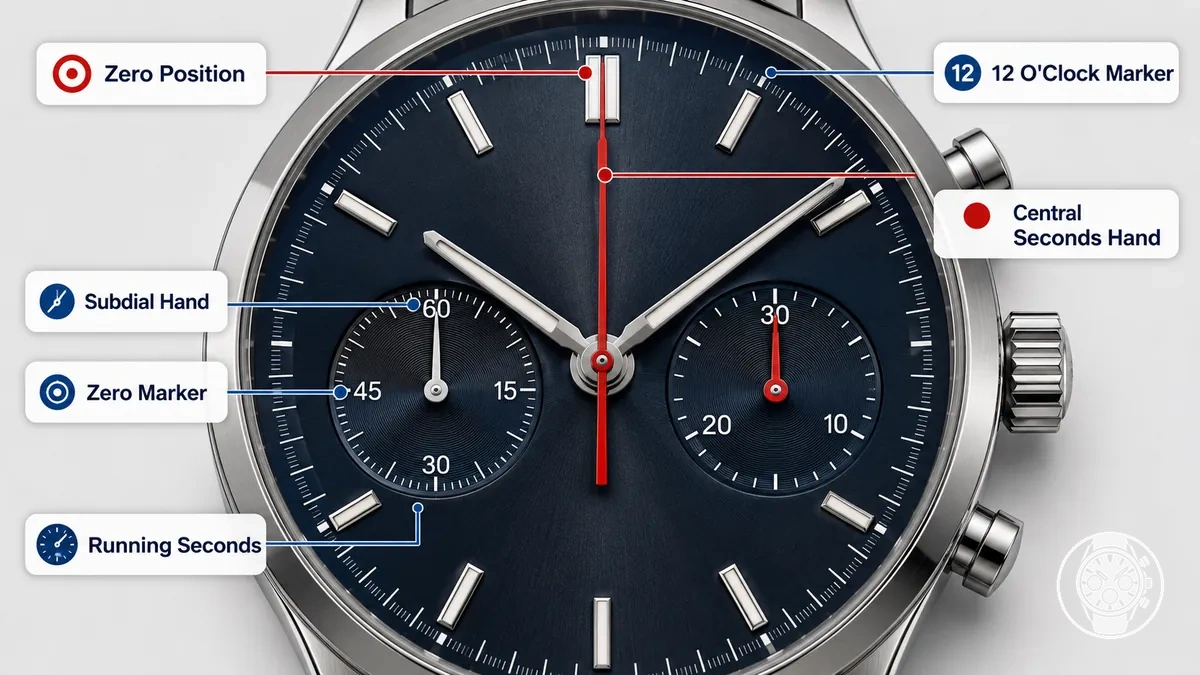
A visual checklist helps verify the relevant reference points without treating every dial hand as a chronograph reset target.
- Central seconds hand: Check whether the chronograph hand returns to the zero position and matches the intended marker position after reset.
- Minute counter: Verify that the minute counter is a chronograph counting display before checking its return point.
- Subdial hand: Identify the subdial function first because a subdial may represent running seconds or a 24-hour display rather than a resettable chronograph counter.
- Marker position: Use the visible zero marker or 12 o’clock alignment point when the watch design assigns that location as the reset reference point.
- Reset behavior: Compare repeated resets to determine whether the hand returns consistently to the same position.
Symptoms That Need Chronograph Hand Calibration
Chronograph hand calibration is relevant when a chronograph consistently resets away from its intended zero position after normal use. A repeated off-zero reset of the chronograph seconds hand or a resettable subdial counter can indicate a hand alignment symptom that may require calibration checks. A single unusual position does not confirm a calibration issue because movement design, model variation, and operating conditions can affect reset behavior.
The main distinction is between repeatable misalignment and erratic movement.
The main distinction is between repeatable misalignment and erratic movement. A chronograph seconds hand that returns to the same incorrect marker after every reset shows a repeated offset pattern, while hands that move unpredictably or return to changing positions may indicate a broader troubleshooting condition rather than a simple calibration adjustment.
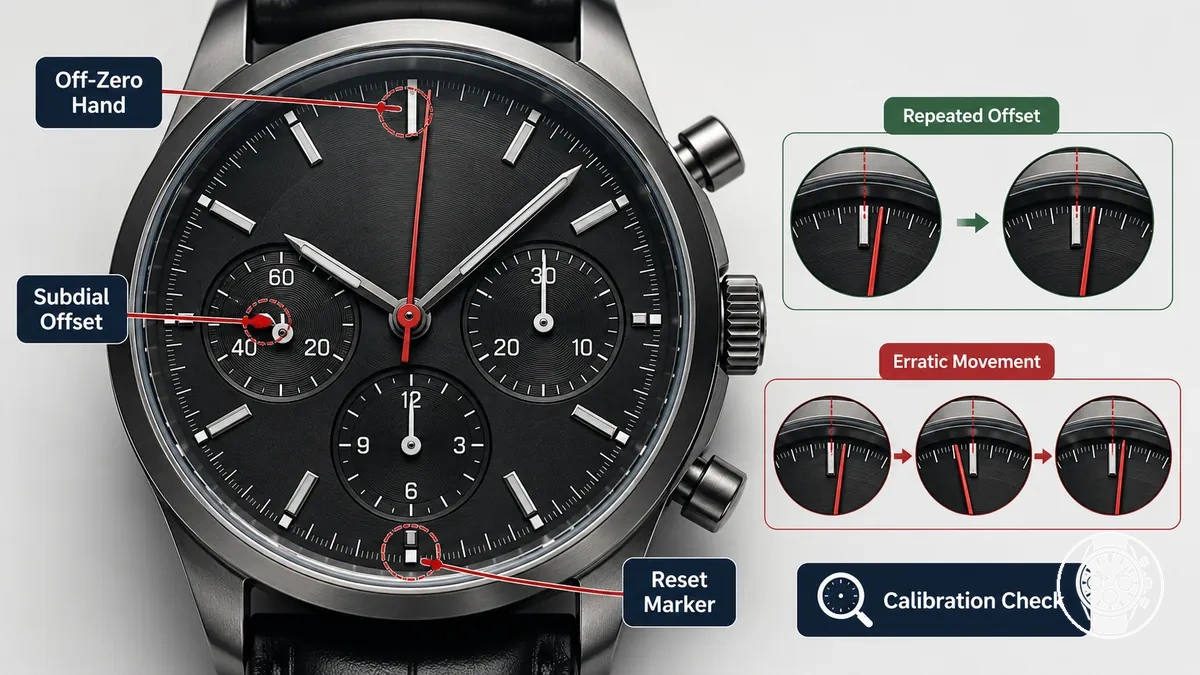
The following diagnostic checks separate symptoms where calibration may be relevant from symptoms that require further evaluation.
- Chronograph seconds hand: A central chronograph seconds hand that repeatedly stops away from the reset position at the same marker can indicate a consistent alignment symptom suitable for calibration checks.
- Subdial counter: A subdial counter that repeatedly returns away from its zero marker may require a calibration check if the subdial is confirmed to be a resettable chronograph display.
- Repeated offset: A hand that returns to the same incorrect position after multiple resets shows a repeatable symptom, which is different from an inconsistent reset pattern.
- Battery change: A calibration symptom appearing after a battery change may relate to the chronograph reset state or movement-specific behavior, but the battery change alone does not confirm a single cause.
- Impact: A visible hand position change after impact may require additional assessment because the cause cannot be determined from the symptom alone.
- Accidental pusher use: Recent accidental pusher use can explain unexpected chronograph behavior because pushers control chronograph functions and may change the display state.
- Erratic movement: Hands that move unpredictably or fail to return consistently are a stop signal for broader troubleshooting rather than assuming calibration will resolve the issue.
Second Hand Not Returning to 12
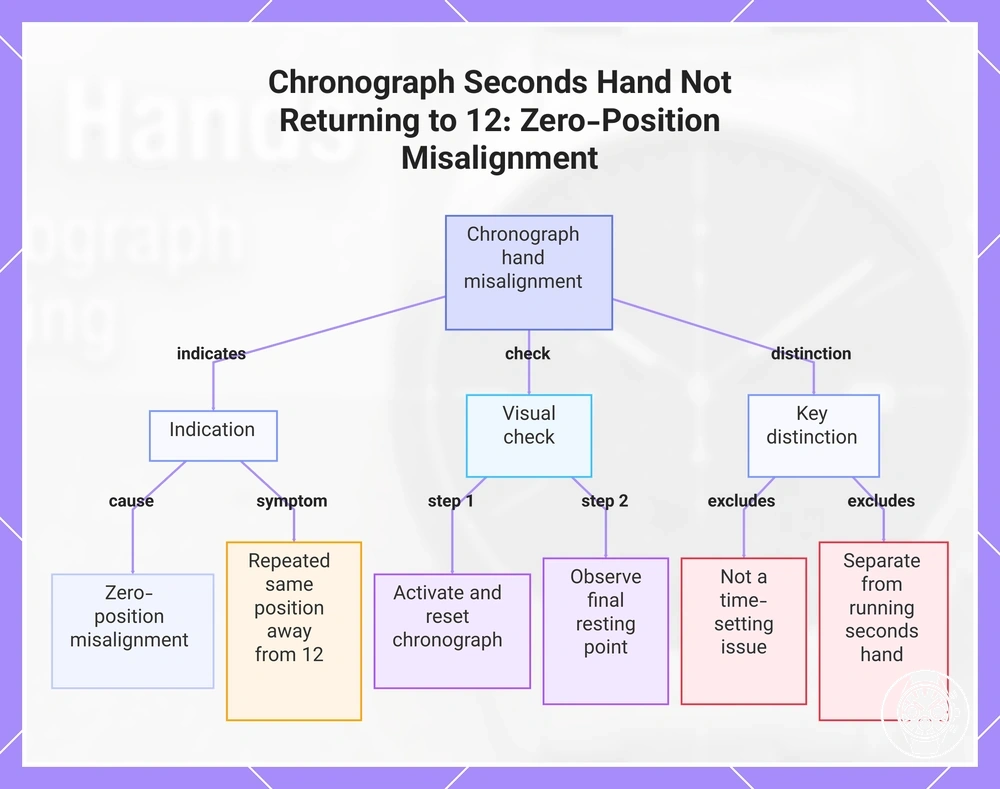
A chronograph seconds hand returning beside 12 after reset usually indicates zero-position misalignment rather than a normal time-setting issue. The symptom occurs when the central chronograph hand does not return to its intended final resting point after the reset action. If the chronograph seconds hand repeatedly returns to the same position away from 12 o’clock, the repeated behavior can indicate calibration relevance.
The normal running seconds hand is a separate time display component and is not the same hand as the chronograph seconds hand.
A local visual check is to activate and reset the chronograph, then observe the final resting point of the chronograph seconds hand. If the hand consistently returns beside 12 instead of the expected zero marker, the symptom belongs to chronograph hand alignment rather than adjustment of the regular time display. The normal running seconds hand is a separate time display component and is not the same hand as the chronograph seconds hand.
This chart shows what a chronograph seconds hand not returning to 12 indicates, how to check it, and what it is not.
This chart shows what a chronograph seconds hand not returning to 12 indicates, how to check it, and what it is not.
Subdial Hand Not Centered at Zero
A subdial hand may need chronograph hand calibration when the subdial belongs to a chronograph counter and returns away from its zero marker after reset behavior. The subdial hand function must be identified before calibration is considered because a minute counter or hour counter can use a zero marker, while a running seconds or 24-hour display may show a normal position without a reset requirement.
A chronograph subdials boundary check helps distinguish resettable counters from non-chronograph displays.
To separate calibration-related symptoms from normal subdial operation, identify whether the subdial is a chronograph counter before checking its position. A chronograph subdials boundary check helps distinguish resettable counters from non-chronograph displays. If a minute counter or hour counter repeatedly returns away from its zero index after reset, calibration may be relevant, while running seconds and 24-hour displays may not be intended to center at zero.
- Minute counter: A minute counter subdial hand that returns away from its zero marker after chronograph reset behavior may indicate a calibration-related alignment issue.
- Hour counter: An hour counter subdial hand that does not return to its expected zero index may require checking when the subdial is confirmed as a chronograph counter.
- Running seconds: A running seconds subdial shows continuous time display information, so an off-center position does not automatically indicate a chronograph calibration issue.
- 24-hour display: A 24-hour display uses time indication rather than chronograph counting, so its hand position may not correspond to a chronograph zero marker.
- Zero index: Compare the subdial hand with the zero index only after confirming that the subdial uses reset behavior as part of a chronograph function.
Before Adjusting the Chronograph Hands
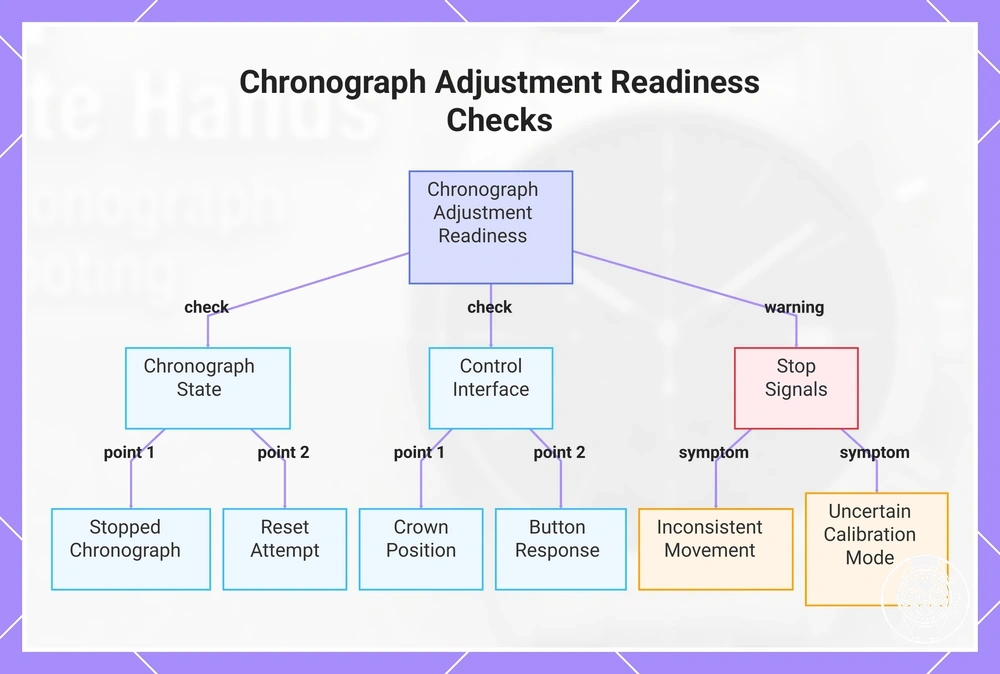
Preconditions should be confirmed before adjusting chronograph hands to ensure the watch is in a suitable control state for reset mode or calibration mode. A stopped chronograph, completed reset attempt, correct crown position, and expected button response help reduce accidental mis-setting before adjustment. Because chronograph controls differ between movements, model-specific instructions determine the correct conditions for entering calibration mode.
The following readiness checks help determine whether adjustment should proceed safely.
The following readiness checks help determine whether adjustment should proceed safely. Each check verifies a control condition that can affect the interpretation of hand position and button behavior.
- Stopped chronograph: Confirm that the chronograph is stopped before adjustment. If the chronograph is still active, the hand position may not represent the intended reset state.
- Reset attempt: Complete the normal reset attempt before entering calibration mode. If the hands do not return as expected, record the symptom before changing settings.
- Crown position: Verify that the crown position matches the model-specific instructions. An incorrect control state can prevent pushers from performing their expected function.
- Button response: Check that the pushers respond consistently with the expected controls. Unexpected button behavior is a stop signal before adjustment.
- Battery condition: Consider whether a recent battery change or inconsistent operation appeared before adjustment. Battery-related behavior may require further assessment rather than immediate calibration.
- Model-specific instructions: Confirm the correct instructions for the specific watch movement. Chronograph calibration controls can vary between designs.
- Water exposure: Consider recent water exposure before operating the crown or pushers. Suspected water exposure is a reason to stop before further adjustment.
Stop signals include inconsistent movement, controls that do not match the expected response, or uncertainty about the correct calibration mode. In these situations, the next step is to verify the control condition rather than continue adjustment attempts.
In these situations, the next step is to verify the control condition rather than continue adjustment attempts.
This chart shows the essential control state checks and stop signals to verify before adjusting chronograph hands to prevent mis-setting.
Stopwatch State Before Reset
The chronograph should be stopped and reset before a calibration attempt is considered. A stopped stopwatch state confirms that the timing function is not actively measuring, while a running state indicates that the chronograph is still active and may not represent the correct condition for adjustment. A paused state can show that timing has stopped temporarily without confirming that the hands are in the reset state needed for calibration.
The start-stop-reset state should be checked before any adjustment-related action.
The start-stop-reset state should be checked before any adjustment-related action. The following checks help identify the current stopwatch state, visible clues, and the safer next action.
- Running state: Check whether the chronograph hands are still moving after start input. If the stopwatch is running, stop before considering a calibration attempt.
- Paused state: Check whether the chronograph has stopped without completing reset. A paused state may not be the same as the required reset condition.
- Reset state: Check whether the reset action has returned the chronograph hands to their expected position. If the reset result is unclear, avoid entering the wrong mode.
- Pusher input: Confirm that pusher input produces the expected response. Unexpected button behavior can indicate that the chronograph is in the wrong mode for adjustment.
For normal operating steps, refer to how to use the chronograph function before attempting adjustment. If the stopwatch state or pusher response does not match the expected control state, stop before continuing with a calibration attempt.
Crown Position and Model Variation Checks
Crown position and pusher behavior must be verified before adjustment because quartz chronograph control states can vary by model and movement design. The crown position can determine the available control state, while pusher behavior can determine whether the watch is responding in the expected adjustment mode. Model-specific instructions should guide the calibration process because a single sequence does not apply to every chronograph.
The table below organizes possible crown and pusher conditions before adjustment.
The table below organizes possible crown and pusher conditions before adjustment. Use these control states as checks rather than as a replacement for the model-specific instructions.
| Control state | Possible role | What to check | Safe wording |
|---|---|---|---|
| Crown normal | Standard operating control state | Verify whether the watch requires another crown position before adjustment. | Confirm the model-specific instructions before proceeding. |
| Crown halfway | Possible first adjustment position | Check whether the movement assigns this position to calibration mode or another setting function. | The function depends on the movement design. |
| Crown fully pulled out | Possible full setting or control position | Check whether this position changes pusher behavior or available functions. | Do not assume this position enables calibration on every model. |
| Top pusher | Possible hand selection or control input | Check the response after input before continuing adjustment. | Pusher behavior should match the model-specific instructions. |
| Bottom pusher | Possible hand advancement or secondary control input | Check whether the movement uses this input for hand advancement. | Hand advancement depends on the chronograph movement. |
Verify the crown position, pusher behavior, hand selection, and hand advancement response before continuing because an incorrect control state can place the watch in the wrong mode. For related setting preparation, refer to how to set the watch correctly using the instructions for the specific model.
Reset Mode and Pusher Control Logic
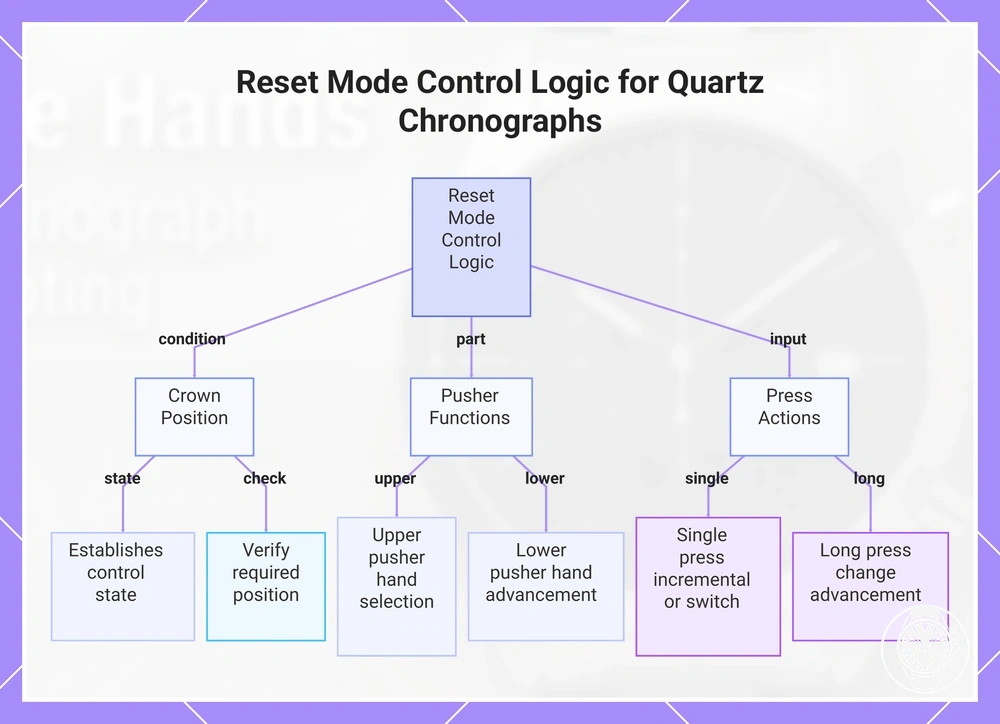
Reset mode is a chronograph control state where crown position and pusher control determine how a selected hand can be identified or moved during adjustment. The upper pusher and lower pusher can have different roles depending on the quartz chronograph movement, including switching the selected hand or controlling hand advancement. Because pusher control logic changes by model, the control state must be verified using the model-specific instructions before adjustment.
Each control should be interpreted according to the movement design and expected response.
The following control actions explain how reset mode inputs can organize hand movement without presenting a universal sequence. Each control should be interpreted according to the movement design and expected response.
- Crown position: The crown position establishes the available control state before adjustment. Verify the required position for the specific movement before using pusher control.
- Upper pusher: The upper pusher may control hand selection or another adjustment function. Check whether the selected hand changes as expected after input.
- Lower pusher: The lower pusher may control hand advancement or another movement function. The effect depends on the chronograph design.
- Single press: A single press may produce one incremental movement or switch the selected hand, depending on the model-specific control logic.
- Long press: A long press may change the advancement behavior on some movements. Confirm the expected response to avoid unintended movement beyond the required zero alignment.
For example, one quartz chronograph movement may use the upper pusher to switch the selected hand and the lower pusher to provide incremental movement toward zero alignment, while another movement may assign different functions. This model variation means reset mode should be treated as conditional control logic rather than a fixed sequence for every watch.
This model variation means reset mode should be treated as conditional control logic rather than a fixed sequence for every watch.
This chart shows the key components of reset mode control logic, including crown position, pusher functions, and press actions, which vary by model.
Crown Positions Used During Calibration
The crown position used during calibration is model-dependent and should be verified before entering calibration mode. The crown position controls which functions are available on a quartz chronograph, but the same crown click may not have the same role across different movements. The normal position, first click, and second click can represent different setting positions, so model-specific instructions should define the correct control state.
Use these crown-position checks as conditional guidance before adjustment rather than as a fixed sequence.
Use these crown-position checks as conditional guidance before adjustment rather than as a fixed sequence.
- Normal position: The crown remains fully seated and may represent the standard operating state. Verify whether the watch requires a different crown position before entering calibration mode.
- First click: The first click may overlap with date/time setting functions on some movements. Check whether this position activates the intended adjustment position before using pusher controls.
- Second click: The second click may provide access to time-setting or another control state. Confirm its purpose before treating it as a chronograph adjustment mode position.
- Date/time setting: A crown position may control date/time setting instead of chronograph adjustment mode. Identify the active function before continuing with calibration-related actions.
- Chronograph adjustment mode: Some movements may use a specific crown position with pusher input for chronograph adjustment mode. The required position remains model-dependent and should be verified before use.
Top and Bottom Pushers Used to Select and Move Hands
Top pusher and bottom pusher controls can manage selected hand changes and hand advancement during calibration mode, but the exact pusher control logic depends on the chronograph movement. The top pusher and bottom pusher may perform different actions, such as hand selection or hand advancement, depending on the model. Short press and long press inputs can also produce different responses, so the selected hand response should be verified before continuing.
The table below organizes common pusher actions and their possible effects without defining a brand-specific sequence.
The table below organizes common pusher actions and their possible effects without defining a brand-specific sequence.
| Pusher action | Possible result | Caution |
|---|---|---|
| Top pusher short press | May switch the selected hand or change the active control target. | Confirm the selected hand before using additional pusher input. |
| Top pusher long press | May change the adjustment response or control how the selected hand is handled. | Long press behavior is movement-dependent and should be verified before continuing. |
| Bottom pusher short press | May provide incremental hand advancement for the selected hand. | Check the hand movement response because advancement behavior varies by model. |
| Bottom pusher long press | May allow continued hand advancement during calibration mode on some movements. | Monitor the selected hand to reduce overshooting the intended zero alignment. |
Pusher control should be treated as conditional movement logic rather than a universal action pattern. A quartz chronograph may use one pusher for hand selection and another for hand advancement, while another movement may assign those controls differently.
How to Zero the Chronograph Hands
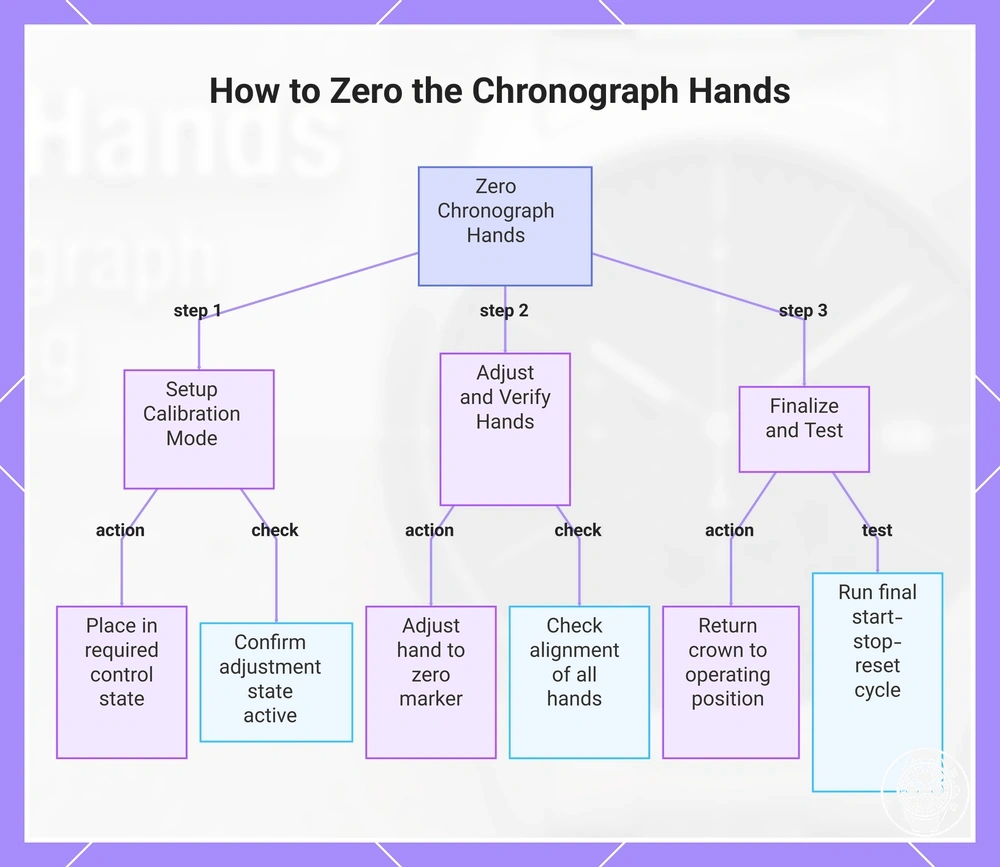
To zero the chronograph hands, move each resettable chronograph hand back to its correct zero marker through calibration mode using the control process defined for the specific movement. Zero calibration aligns resettable hands with their intended reset position after a hand alignment issue. The selected hand, crown position, and pusher response can vary by model, so the model-specific instructions determine the available adjustment controls.
Follow the zeroing process carefully and confirm each observable result before continuing.
Follow the zeroing process carefully and confirm each observable result before continuing. The exact control order can change between movements, but the process normally involves entering calibration mode, selecting the required hand, advancing that hand to the zero marker, and confirming the final alignment.
- Enter calibration mode: Place the chronograph in the required control state for calibration mode according to the model-specific instructions. Confirm that the adjustment state is active before selecting a hand.
- Select the hand: Select the resettable hand that requires alignment. Confirm that the selected hand responds to the control input before moving to the next adjustment step.
- Advance to zero: Advance the selected hand toward the zero marker using the available adjustment control. Check each movement response to avoid overshooting the intended reset position.
- Check central seconds: Confirm that the central seconds hand aligns with its zero marker after adjustment. The central seconds hand should be evaluated as a resettable chronograph hand rather than a separate running time display.
- Check subdial counters: Confirm that resettable subdial counters align with their correct zero markers. Only subdials that function as chronograph counters should be checked as part of zero calibration.
- Confirm alignment: Review the resettable hands together and confirm alignment with their reference markers. If a hand remains misaligned, verify the selected hand and control state before continuing.
- Return the crown: Return the crown to the required operating position after finishing the adjustment. Confirm that the watch has exited calibration mode according to the model-specific instructions.
Complete a final start-stop-reset cycle to verify consistency after zeroing the chronograph hands. If the resettable hands return to their intended zero markers after the cycle, the alignment check is complete; if the result differs, review the movement-specific calibration instructions before further adjustment.
Complete a final start-stop-reset cycle to verify consistency after zeroing the chronograph hands.
This chart shows the step-by-step process to zero the chronograph hands, including calibration mode entry, hand adjustment, and final verification.
Align the Central Chronograph Seconds Hand
Align the central chronograph seconds hand by moving the selected hand back to the zero marker, using the calibration controls defined for the specific chronograph movement. The central chronograph seconds hand should be checked against the 12 o’clock marker when that marker represents the zero reference point. The adjustment process uses incremental movement and visual confirmation rather than physical hand movement.
The adjustment process uses incremental movement and visual confirmation rather than physical hand movement.
Use the following local checks to align the central chronograph seconds hand and confirm the final resting point.
- Select the hand: Confirm that the central chronograph seconds hand is the selected hand before adjustment. Verify that the selected hand responds to the calibration control input.
- Apply incremental movement: Move the selected hand using the available adjustment control. Check the hand position after each movement to track progress toward the zero marker.
- Check the 12 o’clock marker: Compare the central chronograph seconds hand with the 12 o’clock marker when that position represents zero alignment. Confirm the hand visually matches the intended reference point.
- Perform overshoot correction: If the selected hand passes the zero marker, use the movement-specific adjustment control to correct the position. Confirm the final resting point before proceeding.
- Complete a repeated reset check: Run a start-stop-reset cycle and confirm that the central chronograph seconds hand returns consistently to the zero marker. A consistent return position confirms the alignment check is complete.
Align the Minute and Subdial Hands
Align minute counter and subdial hands only when they are resettable chronograph counters with a defined zero marker. The selected counter should be identified before adjustment because subdial hands can represent different functions depending on the movement. Resettable counters can use pusher advancement for adjustment, followed by visual centering at the correct zero marker.
Align minute counter and subdial hands only when they are resettable chronograph counters with a defined zero marker.
Use these checks to align resettable counters while keeping non-chronograph displays outside the calibration process.
- Identify the minute counter: Confirm that the minute counter is a resettable counter before adjustment. Select the counter and verify that the selected counter responds to the calibration control.
- Check the zero marker: Compare the selected counter position with its zero marker. Confirm the expected resting point before applying further adjustment.
- Apply pusher advancement: Use the available pusher advancement control to move the selected counter. Check each movement response and confirm visual centering at zero.
- Align subdial hands: Adjust subdial hands only when they belong to a resettable counter. Confirm that the chronograph subdial reaches its zero marker before completing the adjustment.
- Perform the final reset test: Complete a start-stop-reset cycle and confirm that the minute counter or resettable subdial returns consistently to the zero marker.
A non-chronograph subdial may not move during calibration because it serves another function. Do not adjust a subdial unless its role as a resettable counter has been confirmed for the movement.
When the Hands Still Will Not Reset Correctly
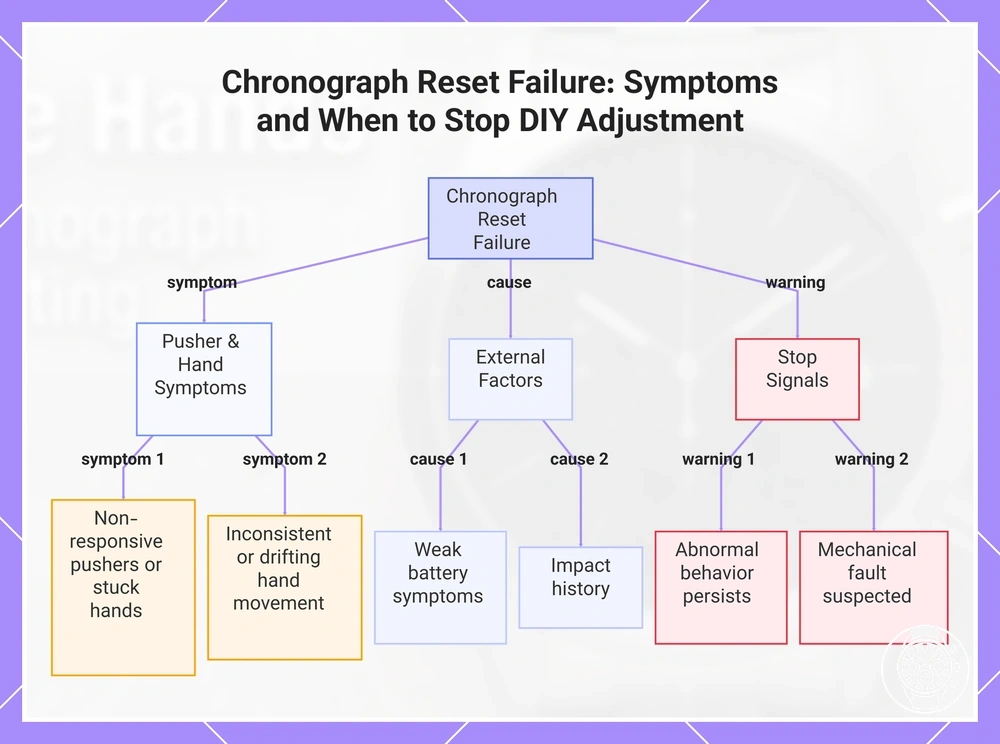
Failed calibration can indicate an issue beyond simple hand alignment, including a control-state issue, weak battery symptoms, impact history, or a need for broader troubleshooting. An unresolved reset failure means the chronograph hands do not return to their expected zero markers after a careful calibration attempt. Calibration can address some alignment conditions, but it does not confirm or resolve every possible movement or mechanical fault.
Calibration can address some alignment conditions, but it does not confirm or resolve every possible movement or mechanical fault.
Use the symptom pattern to determine whether another careful check is appropriate or whether the condition has become a stop signal for further adjustment.
- Non-responsive pushers: If the pushers do not respond as expected during adjustment, verify the control state before continuing. Persistent non-responsive pushers indicate a need for broader troubleshooting.
- Inconsistent hand movement: If the hands move differently between attempts or do not follow expected inputs, treat the inconsistent hand movement as a fault signal rather than a simple alignment issue.
- Weak battery symptoms: If the watch shows reduced responsiveness or irregular operation, consider weak battery symptoms as a possible factor before repeating calibration attempts.
- Impact history: If the reset problem appeared after an impact event, the impact history may be relevant because physical events can affect watch operation.
- Stuck hands: If the hands remain stopped or do not respond during adjustment, stop repeated attempts and consider a broader troubleshooting path.
- Repeated drift: If the hands repeatedly move away from the expected reset position after successful checks, the repeated drift suggests a condition beyond a simple zero alignment issue.
Stop DIY adjustment when abnormal behavior remains after careful reset attempts, especially when pushers, hand movement, or reset behavior continue to act inconsistently. The calibration limit is reached when symptoms suggest a possible mechanical fault or another movement-related condition requiring further evaluation. For additional checks, see chronograph troubleshooting for related fault symptoms and diagnostic guidance.
For additional checks, see chronograph troubleshooting for related fault symptoms and diagnostic guidance.
This chart shows the key symptoms, external factors, and stop signals that help decide when to stop DIY adjustment for a chronograph that fails to reset correctly.
Battery, Impact, or Movement Fault Signals
Battery, impact, or movement fault signals can indicate that a reset problem may involve a power issue, shock-related condition, or movement fault rather than only a zero-position offset. Weak battery, recent battery change, impact history, or abnormal control behavior can change how a chronograph responds during reset attempts. These symptoms identify risk signals but do not confirm a specific internal cause without further evaluation.
These symptoms identify risk signals but do not confirm a specific internal cause without further evaluation.
The diagnostic table below connects each symptom to a possible issue category, a check, and a safer next action.
| Signal | Possible issue | Check | Safe next action |
|---|---|---|---|
| Weak battery | Power issue affecting reset behavior or hand response. | Check whether reduced responsiveness or irregular reset behavior appeared before the alignment problem. | Consider the power condition before repeating calibration attempts. |
| Recent battery change | Reset behavior may have changed after a recent battery change or related service event. | Check whether the reset issue began after the battery change. | Review movement-specific behavior before continuing adjustment. |
| Impact | Shock may be associated with abnormal hand behavior or a possible movement fault. | Check whether the issue appeared after an impact event. | Stop repeated adjustment attempts if abnormal behavior continues. |
| Moisture exposure | Moisture exposure may indicate a condition requiring further assessment. | Check whether water or moisture exposure occurred before the symptom appeared. | Avoid continued control operation until the condition is evaluated. |
| Sticky pusher | Pusher resistance may affect expected control input. | Check whether the pusher response feels inconsistent or does not match the expected action. | Do not force the pusher; consider broader troubleshooting if the symptom remains. |
| Erratic movement | Erratic movement may indicate a broader issue beyond simple alignment. | Check whether hand movement changes between reset attempts. | Treat inconsistent behavior as a fault signal and avoid repeated calibration cycles. |
| Non-repeatable reset position | A non-repeatable reset position may indicate an unresolved issue beyond calibration adjustment. | Compare the final hand position after repeated reset attempts. | Stop DIY adjustment if the reset position remains inconsistent. |
When Broader Troubleshooting or Repair Support Is Needed
Broader troubleshooting or repair support is needed when repeated calibration attempts do not restore hand alignment or when additional fault signals appear beyond a simple hand alignment issue. The stop point is reached when symptoms such as repeated failure, non-moving hands, damaged pushers, uncertain crown positions, moisture signs, battery uncertainty, or movement fault suspicion remain after careful checks. These signals do not confirm a specific internal cause, but they indicate that continued calibration attempts may not address the underlying condition.
The following checklist helps decide when to stop calibration attempts and consider broader troubleshooting or repair support.
The following checklist helps decide when to stop calibration attempts and consider broader troubleshooting or repair support.
- Repeated failure: If the chronograph hands continue returning incorrectly after careful reset attempts, repeated failure is a signal to move beyond further calibration checks.
- Non-moving hands: If the hands do not respond during expected operation, non-moving hands indicate a condition where broader troubleshooting may be more appropriate than continued alignment attempts.
- Damaged pushers: If pushers appear damaged or do not provide expected input, consider repair support because the control response cannot be confirmed.
- Uncertain crown positions: If the correct crown position or control state is uncertain, stop calibration attempts until the operating condition is clear.
- Moisture signs: If moisture signs are present, avoid continued adjustment because the condition may require assessment beyond hand alignment.
- Battery uncertainty or movement fault suspicion: If battery uncertainty remains or symptoms suggest a possible movement fault, use broader troubleshooting rather than repeated calibration attempts.
This section addresses hand alignment limits, while broader faults belong to general chronograph problem diagnosis and repair support. Do not open the case or attempt internal repair steps when the cause remains uncertain.