
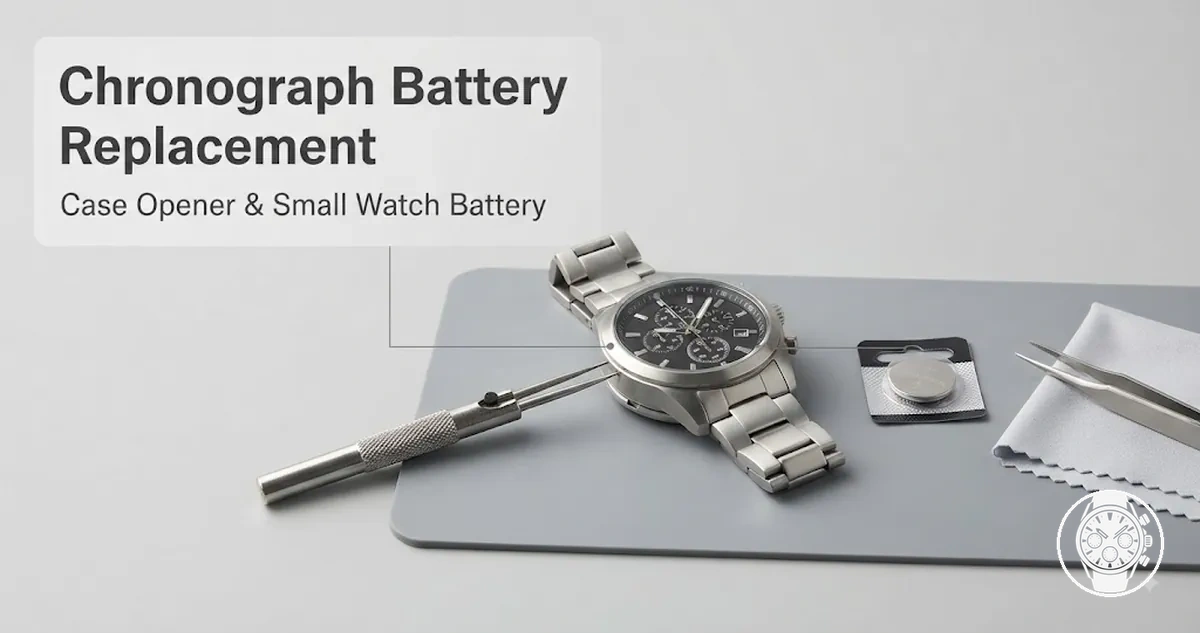
Men’s Quartz Chronograph Watch Battery Replacement
A men’s quartz chronograph watch battery replacement means removing a depleted cell and fitting the battery type specified for that watch or quartz movement while preserving the case seal and movement components. The correct battery code, case-back opening method, and resealing requirement are model-specific; CASIO states that using a battery type other than the one specified for the watch can cause malfunction.
Once the case back is opened, the battery contacts, gasket, pushers, and chronograph movement must remain clean and undamaged so the watch can be tested and resealed correctly.
Once the case back is opened, the battery contacts, gasket, pushers, and chronograph movement must remain clean and undamaged so the watch can be tested and resealed correctly. Citizen Watch states that self-removal of the case back can allow dust to enter and can leave the water sealing incomplete, while CASIO requires a water-resistance check when a battery is replaced. CASIO also recommends replacing watch gaskets about once every 2 to 3 years on applicable water-resistant models, so a damaged or aged gasket can turn a simple battery change into a resealing task that is better handled professionally.
The safest starting point is to identify the existing battery code and the watch or movement reference before removing the cell or disturbing its contacts.
The safest starting point is to identify the existing battery code and the watch or movement reference before removing the cell or disturbing its contacts. Seiko instructs owners to read the calibre code engraved on the case back and use the instructions for that calibre, while CASIO specifies matching the replacement cell to the battery type stated for the individual watch. If the battery code, movement reference, case-back method, or sealing requirement cannot be identified reliably, stop before replacement and have the watch checked professionally.
Table of Contents
Battery Replacement Scope for Men’s Quartz Chronograph Watches
The battery replacement scope for men’s quartz chronograph watches is simple maintenance only when the task is limited to fitting the battery type specified for the watch, preserving the case seal, and confirming normal quartz movement and chronograph function after reassembly. CASIO specifies that a replacement battery must be the type stated for the individual watch and warns that another battery type can cause malfunction. Simple replacement therefore covers battery identification, battery change, case sealing, and a post-replacement function check rather than internal movement repair.
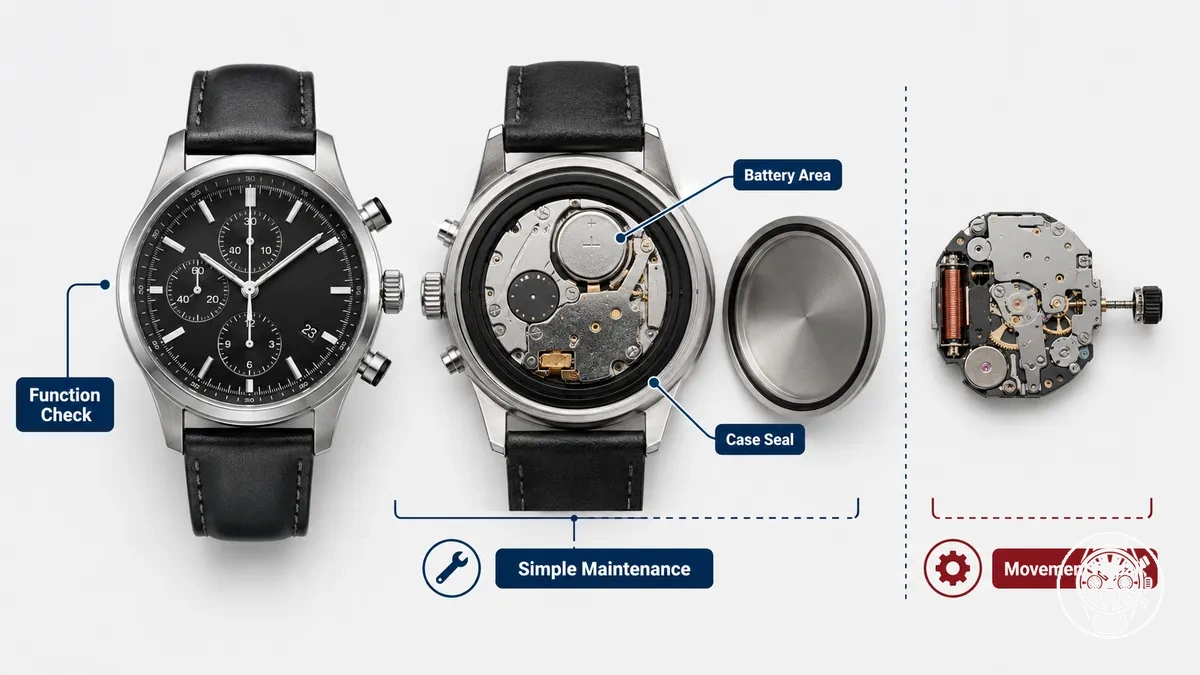
For men’s quartz chronograph watches, the boundary between simple maintenance and movement repair is whether the user can access the specified battery without damaging the movement or contacts and can restore the case seal correctly. Citizen Watch states that opening the case back yourself can allow dust to enter and can leave water sealing incomplete, while CASIO recommends checking water resistance whenever a battery is replaced; these conditions make gasket condition and user skill part of replacement suitability. Battery access and correct resealing remain within the battery replacement scope, but damaged contacts, a chronograph function that remains faulty after the correct battery is fitted, or an internal movement defect falls outside it. When resolving the fault requires work on movement components rather than battery access and case sealing, the task becomes movement repair and should be assessed professionally.
Battery Type, Size, and Equivalent Codes
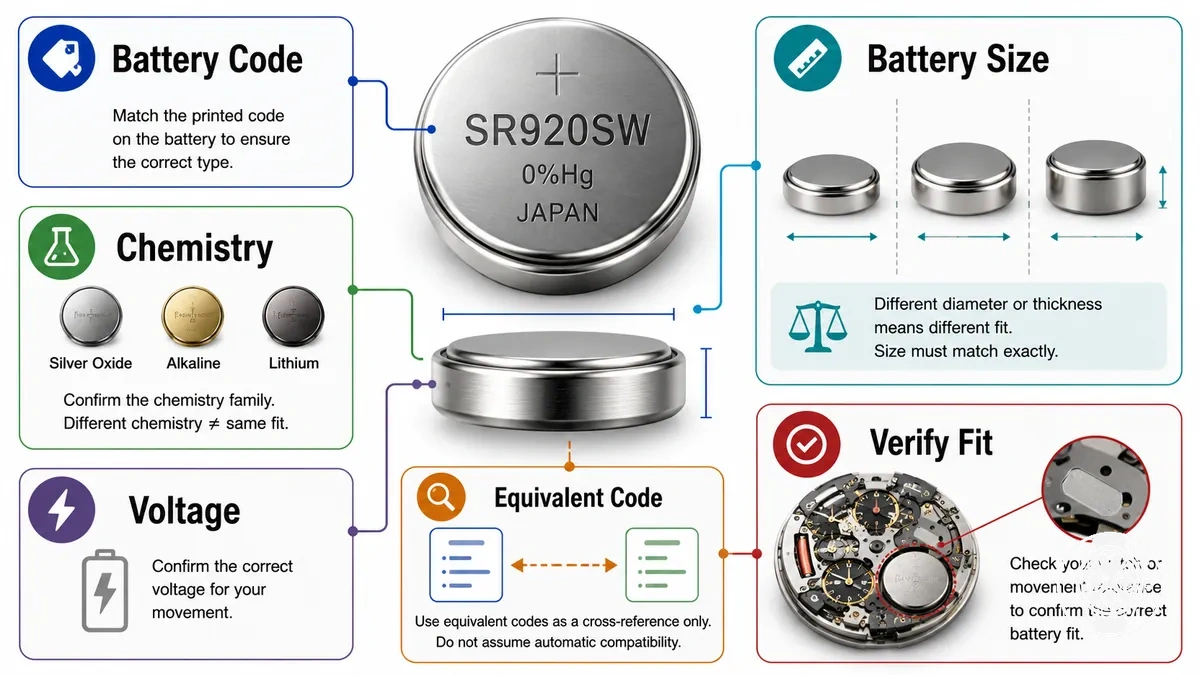
The correct quartz chronograph battery is the battery type and battery size specified by the watch or movement reference, with the battery code, chemistry, voltage, and physical dimensions used together to determine compatibility. Equivalent codes are suitable for verification only when they describe the required battery family and the watch or movement reference supports that substitution; match the existing code when possible.
These manufacturer values show why equal voltage does not establish equal battery size, and equal diameter does not establish equal fit.
The battery code can distinguish cells that share a voltage but not a size: Energizer specifies its silver oxide 357/303 as IEC SR44 at a nominal 1.55 V, with industry-standard dimensions up to 11.60 mm diameter and 5.40 mm height, whereas Renata specifies its silver oxide 376/SR626W at 1.55 V and 6.80 mm diameter by 2.60 mm height. Panasonic specifies the lithium CR2016 at 3 V, 20.0 mm diameter, and 1.6 mm height; its CR-series data also shows that CR2016, CR2025, and CR2032 all have a 20 mm diameter but heights of 1.6 mm, 2.5 mm, and 3.2 mm respectively. These manufacturer values show why equal voltage does not establish equal battery size, and equal diameter does not establish equal fit. An alkaline cross-reference should likewise be used only when the movement documentation permits that chemistry, rather than assuming it can replace a specified silver oxide cell because the nominal voltage or dimensions appear similar.
After code, chemistry, voltage, and size have been checked, battery life expectations are a separate criterion rather than evidence that another battery family is compatible.
After code, chemistry, voltage, and size have been checked, battery life expectations are a separate criterion rather than evidence that another battery family is compatible. Battery Type, Size, and Equivalent Codes are best verified from the existing button-cell marking and the watch or movement reference; the image below shows the markings and fit cues to check before using the code table.
| Battery code | Chemistry | Typical voltage | Equivalent-code caution | Replacement decision |
|---|---|---|---|---|
| 376 / SR626W / SR66 | Silver oxide | 1.55 V — Renata | Renata specifies 6.80 mm diameter × 2.60 mm height; a similar-looking 1.55 V cell with different dimensions is not the same size. | Use this battery family only when the existing code or movement reference specifies SR626W, 376, SR66, or an explicitly supported cross-reference. |
| 357/303 / SR44 | Silver oxide | 1.55 V — Energizer | Energizer designates 357/303 as IEC SR44 and gives industry-standard dimensions up to 11.60 mm diameter × 5.40 mm height, so voltage alone does not make it equivalent to a smaller 1.55 V watch cell. | Use the SR44 family only when the existing code or movement reference supports that code and physical size. |
| CR2016 | Lithium | 3 V — Panasonic | Panasonic specifies 20.0 mm diameter × 1.6 mm height; CR2025 and CR2032 share the 20 mm diameter but are 2.5 mm and 3.2 mm high, respectively. | Use CR2016 only when the movement reference specifies the CR2016 family or a supported cross-reference; matching diameter alone is insufficient. |
| Alkaline button-cell family | Alkaline | Not specified for a particular quartz chronograph by the reviewed evidence | A cross-reference based only on nominal voltage or physical resemblance does not establish the required chemistry or movement compatibility. | Verify the exact movement specification before replacing a specified silver oxide or lithium battery with an alkaline cell. |
Reading the Existing Battery and Movement Reference
The battery marking and movement reference provide two direct criteria for confirming replacement compatibility: use the existing cell code when the battery label is already readable, and verify that code against the manual reference for the identified movement. Seiko Watch Corporation instructs owners to identify the calibre code engraved on the case back and consult the instructions for that calibre, so case-back information and the corresponding manufacturer documentation are the safer evidence source when the existing battery cannot be read without additional case access.
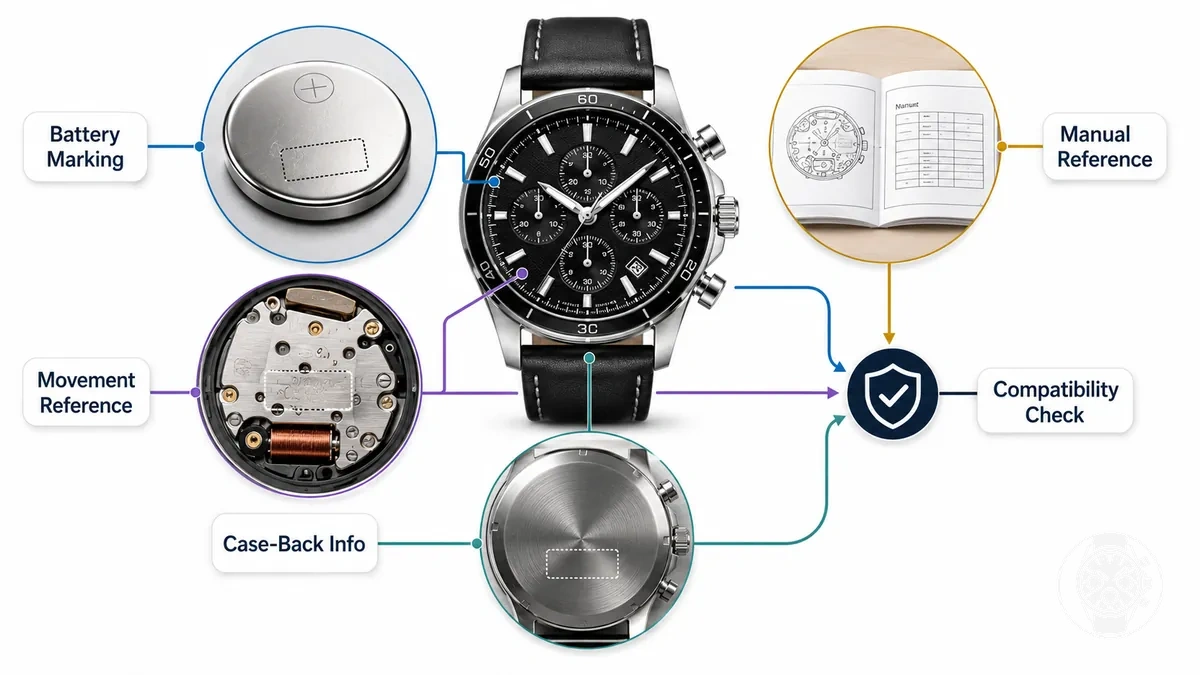
The battery label identifies the existing cell code, while the movement stamp or case-back information identifies which movement documentation should be used to confirm that code rather than treating the installed cell alone as conclusive evidence. Citizen Watch specifies that its case number begins with 4 alphanumeric characters representing the movement number, followed by 6 or more alphanumeric characters; Citizen also states that the engraving position differs by model and that small case-back characters can be difficult to read. In that documented example, the 4-character movement number provides a concrete lookup criterion for the relevant manual reference, while a readable existing cell code provides a separate compatibility check. If the battery marking or movement reference is unreadable, or the existing cell and manufacturer documentation indicate different batteries, do not infer compatibility from the unclear marking; have the required replacement battery verified by a professional watch service.
Silver Oxide, Alkaline, and Lithium Button Cells
Silver oxide, alkaline, and lithium button cells are different chemistries, so quartz chronograph replacement must match the chemistry and drain profile specified for the movement rather than rely on physical fit alone. Murata specifies a nominal voltage of 1.55 V for its SR silver oxide cells, 1.5 V for its LR alkaline manganese cells, and 3 V for its CR lithium cells; Murata also describes silver oxide cells as having stable discharge characteristics, making voltage stability relevant to replacement choice.
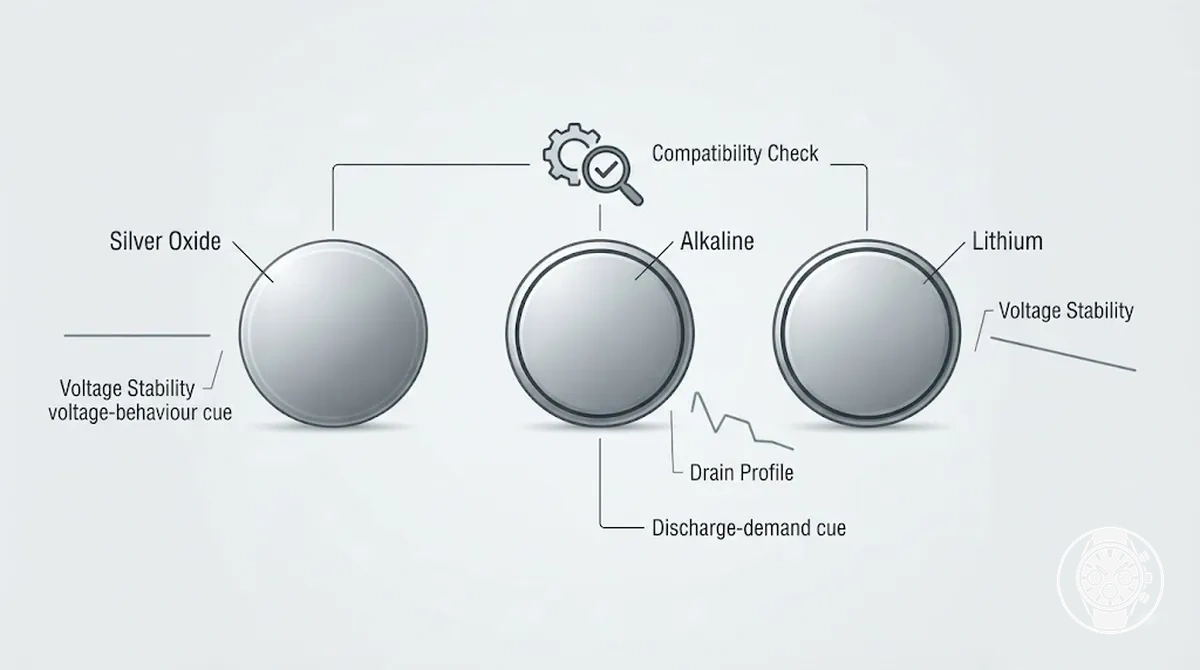
| Cell chemistry | Common role | Main caution | Replacement implication |
|---|---|---|---|
| Silver oxide (SR) | Watch-oriented cells with a nominal voltage of 1.55 V; Murata describes its SR chemistry as having stable discharge characteristics. | The drain profile remains movement-specific. Energizer specifies its 357/303 silver oxide cell at 1.55 V for continuous low-drain operation with high-pulse demand. | Use the specified SR chemistry and drain designation when the quartz chronograph movement requires that battery type. |
| Alkaline manganese (LR) | Button cells with a nominal voltage of 1.5 V according to Murata. | Physical fit does not establish a safe equivalent: Murata specifies both SR44R and LR44R at 11.6 mm diameter × 5.4 mm height, while their nominal voltages are 1.55 V and 1.5 V respectively. | Use an LR replacement only when the movement specification permits alkaline chemistry and its applicable drain profile. |
| Lithium (CR) | Coin-type cells with a nominal voltage of 3 V according to Murata. | The 3 V nominal voltage differs from the 1.55 V SR and 1.5 V LR chemistries, so physical resemblance does not establish electrical compatibility. | Use a CR lithium button cell only when the particular watch or movement specifies the corresponding lithium battery type. |
The chemistry comparison shows why substitution remains model-dependent even when two cells physically fit the same space. For example, Murata specifies SR44R and LR44R at the same 11.6 mm × 5.4 mm dimensions but at nominal voltages of 1.55 V and 1.5 V respectively, while Panasonic specifies its CR2016 lithium cell at 3 V and a 0.1 mA standard continuous drain. These documented differences mean that dimensions, voltage behaviour, chemistry, and the required drain profile must agree with the movement specification before a physically similar cell can be treated as a safe equivalent for quartz chronograph replacement.
Case-Back Type and Opening Method
The case-back type determines the appropriate opening method for a men’s quartz chronograph: a snap-back requires engagement at its intended lip or edge notch, while a screw-back or notched case back requires a case opener that securely engages the back’s designed contact points. The gasket position and case material also affect damage risk because the opening tool must remain clear of the seal and securely located on the intended contact surface. Identify the case-back type and its engagement features before opening.
Identify the case-back type and its engagement features before opening.
Esslinger distinguishes pressure-fit snap-backs, screw-off backs identified by perimeter notches, and backs retained by separate screws; these visible features determine the applicable tool approach. A snap-back should be approached at its identifiable opening lip or notch with a case knife, whereas a notched screw-back requires a case opener whose pins remain seated in the available notches while turning pressure is applied. On a sealed watch, the gasket occupies the case-to-back sealing interface, so an opening method that cuts, pinches, displaces, or contaminates that gasket creates a resealing risk; a slipping tool can also scratch or deform the case material at its contact point. If the intended engagement feature cannot be identified, the opener cannot remain securely engaged, or the back resists controlled tool pressure, the opening task has crossed from routine battery access into a repair-risk situation.
The case-back table applies those visible criteria without treating different watch backs as interchangeable.
The practical selection criteria are therefore the retention system, visible engagement points, gasket location, and case material at the tool-contact area. The case-back table applies those visible criteria without treating different watch backs as interchangeable.
| Case-back type | Visible cue | Tool approach | Main damage risk |
|---|---|---|---|
| Snap-back | Smooth pressure-fit back with an identifiable lip, groove, or edge notch for opening. | Use a case knife or corresponding case opener only at the intended opening feature and only when its edge can be positioned securely without entering the gasket or movement area. | A slipping or misplaced blade can scratch the case, deform the back, or damage the gasket; if the opening feature is unclear, professional opening avoids creating an unintended contact point. |
| Screw-back | Threaded back designed to rotate relative to the case; its tool-contact pattern depends on the particular watch back. | Use a case opener matched to the back’s visible engagement pattern and continue only while the opener maintains secure contact under controlled turning pressure. | Poor engagement can mark the back or case when the opener slips; persistent resistance with secure tool fit is a boundary for professional service rather than increased pressure. |
| Notched screw-back | Two or more perimeter notches or slots provide positive engagement points for a case-back wrench. | Use a two-pin, three-pin, or corresponding case opener only when its pins align with the available notches; DIY Watch Club notes that a three-pin opener engages one additional notch compared with a two-pin design. | Misaligned pins can leave the notches and damage the back or adjacent case material; stop if the pins cannot remain fully seated while the back is turned. |
| Back retained by screws | Separate screw heads are visible around the back; Esslinger identifies this as a distinct retention method rather than a screw-off back. | Use a precision screwdriver that seats securely in each screw head instead of a rotating screw-back opener. | A poorly fitting driver can damage the screw head or surrounding case material; stop if the driver cannot seat securely. |
Snap-Back, Screw-Back, and Notched Case Backs
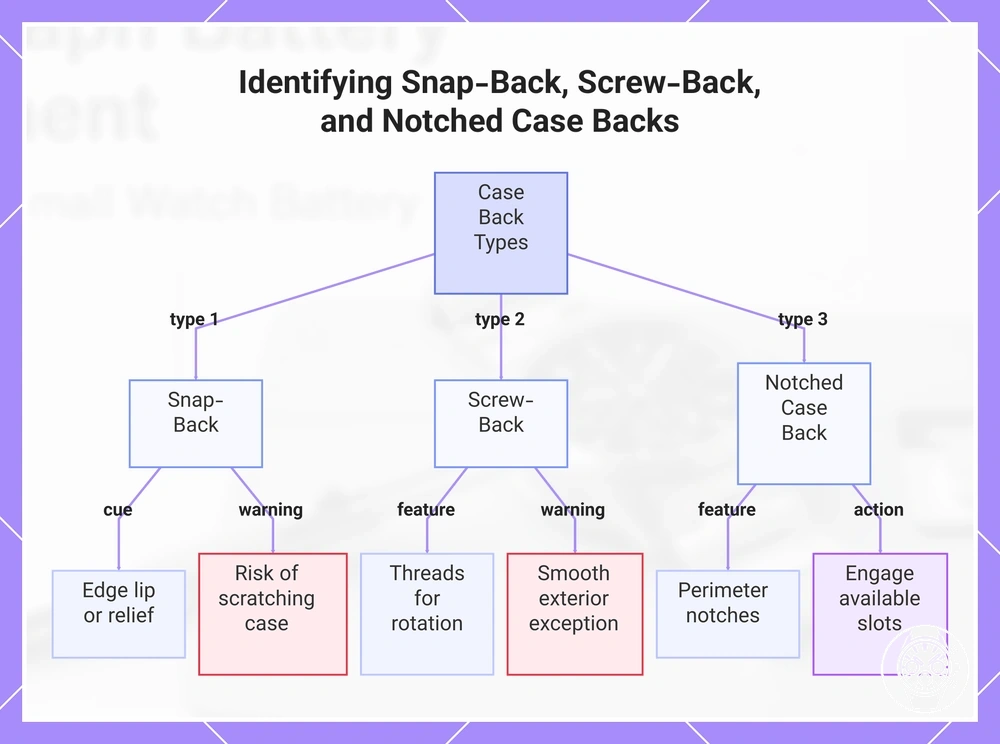
A men’s quartz chronograph case back can be identified locally as a snap-back when an edge lip or opening relief provides a lifting point, as a screw-back when threads retain the cover for rotational removal, or as a notched case back when perimeter notches provide defined tool contact for an opener. Watch Repair Talk distinguishes snap backs by a relief intended for a case knife and screw-on backs by features used for rotational tool engagement, while noting that a screw-on back can also have a smooth exterior. The visual cue is therefore the intended pressure or engagement point: edge lip for controlled lifting, or threads and corresponding engagement features for rotation.
- Snap-back: An edge lip, relief, or designated opening point is the visible cue; a case knife contacts that point to lift the press back. Applying tool contact at an arbitrary seam instead of the identified opening feature increases the risk of scratching the case or disturbing the sealing interface.
- Screw-back: Threads retain the cover, so the access direction is rotation rather than lifting at an edge lip. Because Watch Repair Talk notes that a screw-on back can be completely smooth, the absence of notches does not by itself classify a smooth back as a snap-back; uncertain identification should be resolved before pressure is applied.
- Notched case back: Perimeter notches or case-back slots provide the visible engagement points for an opener and indicate rotational tool contact. The notch pattern is specific to the case-back design, so the opener should engage the available slots rather than an unfeatured part of the back.
The local contrast is the direction and location of tool contact: a recognised snap-back opening point supports lifting, whereas a threaded screw-back or notched case back requires rotational engagement with the applicable back features. For example, Watch Repair Talk documents smooth screw-on backs as an exception to the usual visible engagement pattern; if such a threaded cover is misidentified as a snap-back and a case knife is inserted at an arbitrary seam, the attempted lifting action can scratch the case or damage the sealing interface instead of releasing the threads.
This chart shows the three main case back types, their key identification features, and important warnings to avoid damage.
This chart shows the three main case back types, their key identification features, and important warnings to avoid damage.
When Not to Force a Stuck Case Back
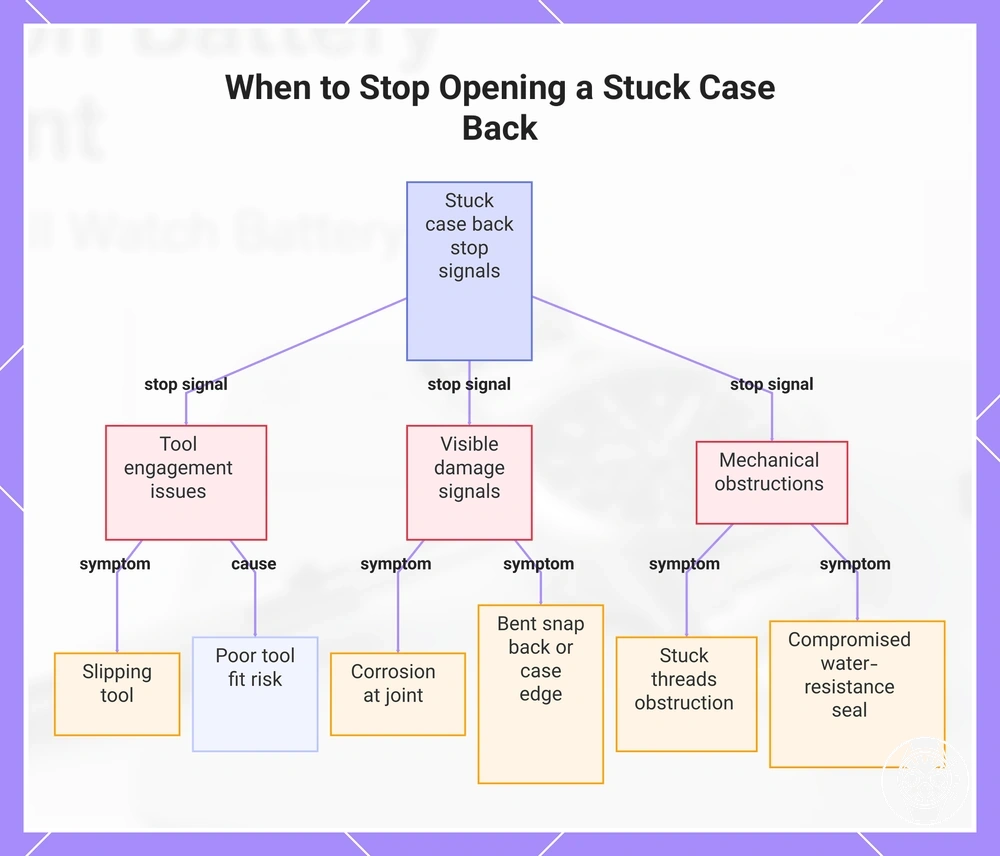
Stop trying to open a stuck case back when resistance increases while tool engagement becomes insecure, a slipping tool develops, or the case or back begins to deform. No universal opening-force or torque threshold is established by the reviewed evidence, so the practical stop threshold is observable loss of secure tool contact, visible damage, corrosion at the joint, or resistance that prevents controlled opening.
Treat the following conditions as stop signals rather than normal reasons to increase opening pressure.
Treat the following conditions as stop signals rather than normal reasons to increase opening pressure.
- Slipping tool: Stop when the opener or case knife cannot remain securely engaged. Poor tool fit increases the chance that the tool will slip onto the case surface and cause a scratch or deformation.
- Stuck threads: Stop when a threaded back begins to rotate but then encounters a firm obstruction instead of continuing to unscrew under controlled engagement. The reviewed evidence does not establish a universal number of degrees, torque value, or additional-force allowance that makes continued turning safe.
- Corrosion: Stop when corrosion is visible at the case-back joint or thread area. Corrosion is a risk signal because the joint condition may be contributing to the resistance, and the required release force cannot be determined reliably from appearance alone.
- Bent snap back or soft case metal: Stop if the back or surrounding case edge begins to bend, dent, or develop tool marks. Visible deformation means the opening attempt is already affecting the case rather than simply releasing the back.
- Water-resistance seal: Stop if the gasket or sealing interface is displaced, deteriorated, stuck, or visibly damaged. Citizen Watch warns that removing a case back can allow dust to enter and can leave water sealing incomplete, so a compromised seal requires inspection and correct resealing rather than additional opening pressure.
Resistance alone does not establish whether a stuck case back has a seized thread, corrosion, seal interference, deformation, or another obstruction, so the decision should be based on observable stop signals rather than an assumed cause. Because the reviewed evidence provides no general numerical force or torque limit for men’s quartz chronograph case backs, continued opening cannot be justified by staying below a universal measurement threshold. If secure tool engagement cannot be maintained, corrosion or deformation is visible, the water-resistance seal is compromised, or controlled opening remains obstructed, stop and use professional watch service for assessment.
This chart shows the observable stop signals that indicate you should stop trying to open a stuck case back and seek professional service.
This chart shows the observable stop signals that indicate you should stop trying to open a stuck case back and seek professional service.
Tools and Parts Needed for Battery Replacement
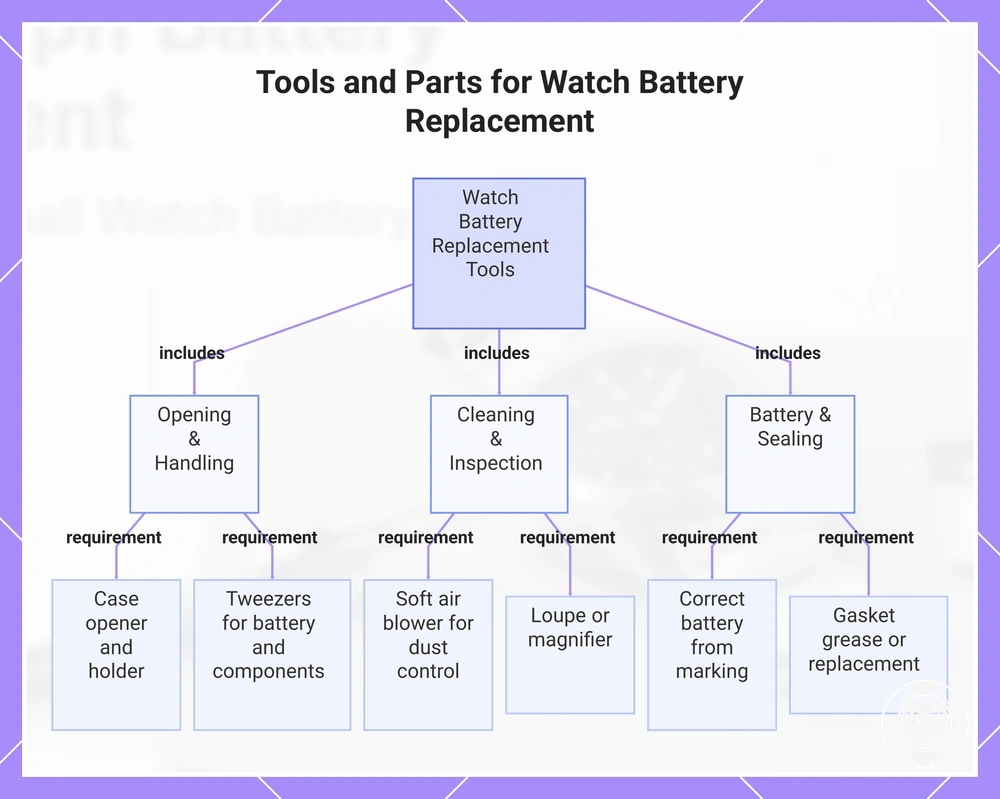
Watch battery replacement tools should cover five jobs: opening and supporting the case, handling the battery, controlling dust and inspecting small parts, supplying the correct battery, and resealing a serviceable gasket. The required case opener depends on the case-back type and secure tool fit, so every watch does not require the same opening tool.
The practical checklist groups preparation by opening, handling, cleaning and inspection, battery replacement, and sealing.
Prepare the applicable tools and consumables before the case is opened so the movement and battery do not need to remain exposed while missing items are found. The practical checklist groups preparation by opening, handling, cleaning and inspection, battery replacement, and sealing.
- Opening — case opener and case holder: Use a case opener that matches the case-back engagement method, together with a case holder or case cushion when stable support is needed. A snap-back opening point calls for a suitable case knife, whereas a back designed for rotational engagement calls for the corresponding screw-back opener; tool choice is conditional on the case-back type rather than universal.
- Handling — tweezers: Use plastic battery tweezers for direct battery handling and suitable non-magnetic tweezers when small components must be controlled without unnecessary contact. Esslinger’s battery-replacement guidance specifically uses plastic tweezers to pick up the replacement battery, providing a defined handling method when the cell is being positioned.
- Cleaning — dust control: Work on a clean surface and use a soft air blower or equivalent controlled dust-removal method when loose particles are present around the accessible case or movement area. Dust control is needed when particles are visible or could otherwise remain inside the case during closure; avoid introducing fibres or uncontrolled debris while cleaning.
- Inspection — magnification: Use a loupe or magnifier when the battery marking, contacts, gasket, or small retaining parts cannot be inspected clearly unaided. As a sourced numerical example, Esslinger lists a 5× eye loupe in one watch-service tool set; 5× is a product-specific magnification example, not a minimum or universal requirement for quartz chronograph battery replacement.
- Battery — correct battery: Prepare the correct battery identified from the watch or movement specification and, where readable, cross-check it against the existing cell marking. The required battery code, chemistry, voltage, and dimensions are model-specific, so no single battery specification applies to all men’s quartz chronograph watches.
- Sealing — gasket grease: Use watch-appropriate gasket grease when the existing gasket is serviceable and its resealing procedure calls for lubrication; replace or professionally assess a damaged or incorrectly fitting seal rather than treating grease as a substitute. Seiko Instruments identifies TSF-451 silicone grease for watch waterproof packing and related watch components, while the reviewed evidence establishes no universal grease quantity for all quartz chronograph case backs.
This chart groups the tools and parts needed for watch battery replacement into three preparation areas: opening & handling, cleaning & inspection, and battery & sealing.
How to Replace the Battery and Reseal the Case
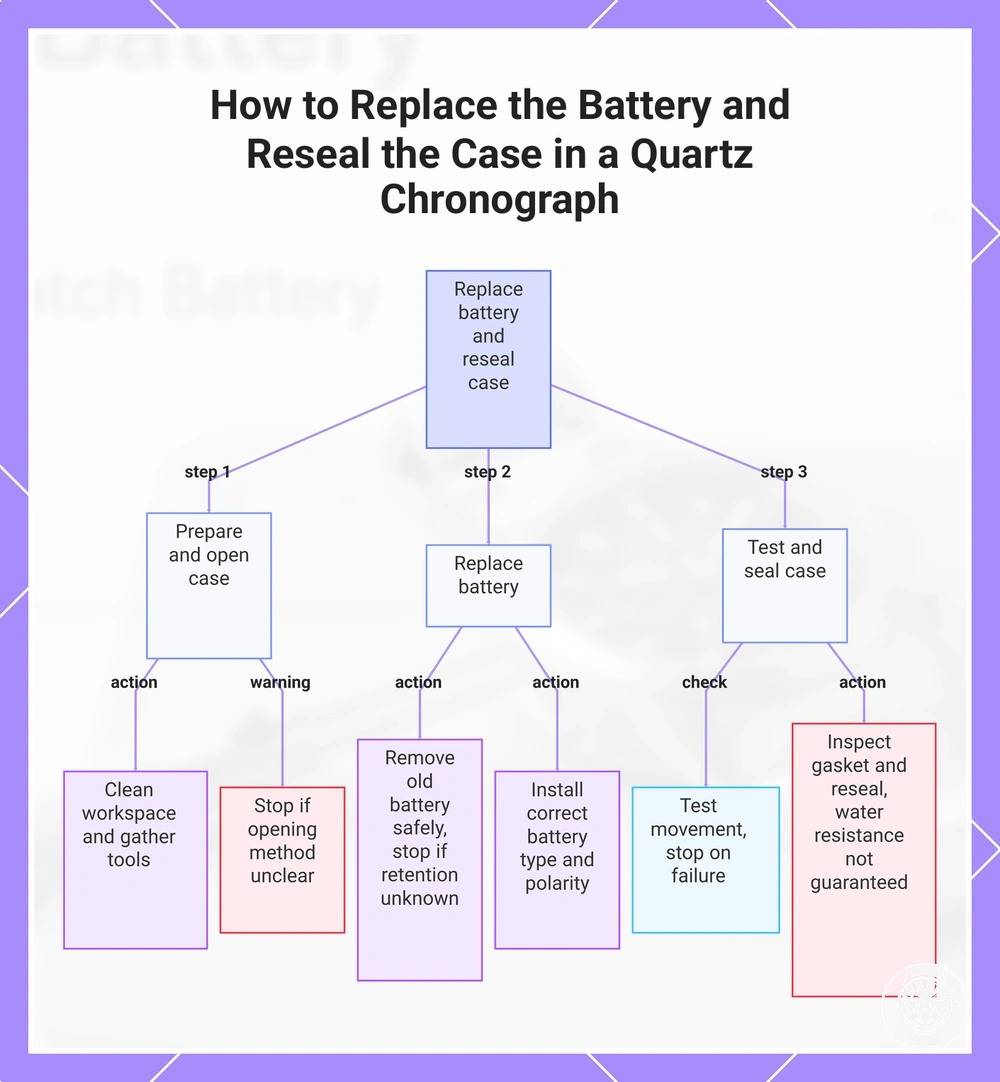
To replace the battery in a men’s quartz chronograph, prepare a clean workspace, open the case back with the correct case opener, remove old battery hardware without damaging the contacts, install new battery in the specified polarity, test movement operation, inspect the gasket, and reseal the case with its original retention method. The exact opening, battery-retention, reset, and gasket procedure is model-specific; Citizen Watch states that removing a case back can admit dust and leave water sealing incomplete, so stop if the watch-specific arrangement or sealing procedure cannot be identified.
- Prepare the workspace and watch. Keep the work surface clean and stable, remove loose exterior dirt, and have the specified replacement cell and case opener ready before exposing the movement. If the case-back type or its intended engagement point is unclear, stop before applying opening pressure.
- Open the case back. Use the method that matches the identified back: lift only at the designated opening point of an applicable snap-back, rotate an applicable threaded back with secure engagement, or use the correctly fitting driver on a screw-retained back. Stop if the tool slips, the case begins to deform, or controlled engagement cannot be maintained.
- Remove old battery and protect the contacts. Record the existing cell code, polarity, and retention arrangement before releasing the battery, then move only the clip, screw, insulator, or contact required by that movement. Do not bend or short the contacts; if the retention system cannot be identified, stop instead of forcing the cell out.
- Install new battery. Fit only the battery type specified for the watch or movement and reproduce its documented polarity and retention arrangement; CASIO states that using a battery type other than the type specified in the watch specifications can cause malfunction. As a model-specific example, Citizen’s YF10 manual specifies a replacement cell with the plus (+) side facing upward, but that orientation applies to YF10 and should not be generalised to another quartz movement.
- Test movement operation. With the new battery secured, confirm that timekeeping resumes and test the chronograph functions before closing the case; perform an electrical or movement reset only when the applicable manufacturer instructions specify one. If the correct replacement cell is installed but the movement or chronograph does not respond as documented, stop before moving into internal diagnosis or repair.
- Inspect the gasket. Before resealing, check that the gasket is correctly positioned and has no visible cracking, distortion, contamination, or displacement. Citizen Watch states that water-resistant watches use sealing gaskets at areas including the case back and that its watches with replaceable batteries have their water-resistant gaskets replaced during battery replacement; if the correct gasket specification or condition cannot be confirmed, stop and use professional service.
- Reseal the case. Refit the case back using its original retention method while keeping the gasket and closing surfaces clear of dust and foreign material. Citizen’s YF10 manual specifically requires its rubber waterproof packing to be correctly positioned before its case back is refitted, while CASIO instructs users to request a water-resistance check when a battery is replaced; therefore, closing the case back is not evidence by itself that the watch’s stated water-resistance performance has been restored.
This chart shows the main steps, checks, and warnings for replacing the battery and resealing the case of a men's quartz chronograph.
Removing the Old Battery Without Disturbing Contacts
Remove the old battery only after identifying its orientation, battery clamp or retaining clip, contact spring, and any plastic insulator; use tweezers to control the cell without using the contacts as leverage. The release path is movement-specific: CASIO's Module 1633 battery procedure identifies a battery holder that must be removed before the old battery, so the applicable movement instructions determine how a clamp or holder is released while contact protection remains the priority.
Stop if the battery clamp or retaining clip has no clearly identified release path, if the contact spring moves with the retainer, or if removal would require using a contact as the leverage point.
Support the watch so it does not shift, note the old battery orientation before lifting it, and keep any plastic insulator in its identified position because these parts affect the local battery and contact arrangement. CASIO's Module 1633 procedure distinguishes the battery holder from the AC contact, demonstrating that a retaining component and an electrical contact can perform separate functions; the reviewed manufacturer evidence does not specify one universal tweezer touchpoint, contact-spring pressure, or clip-release direction for all quartz chronograph movements. Stop if the battery clamp or retaining clip has no clearly identified release path, if the contact spring moves with the retainer, or if removal would require using a contact as the leverage point.
- Hand position: Support the watch against movement while the old battery is controlled with tweezers; keep hand pressure away from exposed contacts and the contact spring.
- Tool touchpoint: Place the tweezers on an accessible part of the old battery or its documented retainer, not on a delicate electrical contact; the exact touchpoint is not universally specified and must follow the movement arrangement.
- Clip handling: Release the battery clamp, cell holder, or retaining clip through its identified mechanism before lifting the cell. CASIO's Module 1633 provides a model-specific example in which the battery holder is removed before the old battery.
- Orientation: Record the old battery orientation and the plastic insulator position before either is displaced so the battery, insulator, and contact spring remain distinguishable during removal.
- Stop signal: Stop when the clip-release path is unclear, the retainer cannot be separated from the contact spring confidently, or the available tool contact would place leverage on the contacts.
Installing the New Battery and Testing the Movement
Install the new battery with the polarity specified for the movement, confirm complete battery seating, and ensure the normal retainer or spring provides contact pressure without manually bending the contact. Citizen's YF10 instructions provide a model-specific example: the replacement cell is installed with the plus (+) side facing upward and an all-reset is required after battery replacement, so neither polarity nor reset procedure should be generalised across quartz chronograph movements. Perform the movement test before closing the case to reduce the risk of reopening it for an unresolved seating, contact, or reset requirement.
These are pre-closure response checks rather than proof that every movement function is fault-free.
After installation, check whether the seconds hand advances or the applicable display becomes active, then operate the chronograph pusher and observe whether the corresponding chronograph function responds. These are pre-closure response checks rather than proof that every movement function is fault-free. If the new battery has the specified polarity and correct battery seating but the expected movement response is absent, perform a reset only when the applicable manufacturer instructions specify one; otherwise, leave the case open for appropriate service rather than assuming battery replacement has resolved the fault.
- Polarity check: Confirm that the new battery matches the polarity specified for the movement. In Citizen's YF10 example, plus (+) faces upward; a different movement requires its own documented orientation.
- Battery seating check: Confirm that the seated cell lies in its intended holder and that its clamp or retainer is in the documented position. A displaced cell means installation is incomplete and should be corrected before testing.
- Contact pressure check: Confirm that the normal battery contact meets the seated cell through its designed spring or retainer arrangement. If contact requires bending or improvised pressure to maintain electrical connection, stop rather than altering the contact geometry.
- Seconds hand or display check: Observe whether the seconds hand advances or, where applicable, whether the display becomes active. A visible response means the movement has responded to the installed cell, but it does not establish that every chronograph function operates correctly.
- Chronograph pusher check: Operate the chronograph pusher according to the watch's documented controls and observe the corresponding chronograph indication. A response supports proceeding with closure; no response means the movement-specific reset requirement or service need remains unresolved.
- Pre-closure check: Close the case only after the expected local movement and chronograph responses are present or any manufacturer-specified battery-change reset has been completed. Citizen's YF10 procedure demonstrates that an all-reset can be an explicit post-replacement requirement, so an unexplained failed response should remain unresolved until the applicable movement instructions or service procedure addresses it.
Cleaning, Greasing, and Seating the Gasket
The case-back gasket should be cleaned, inspected, conditionally greased with silicone grease, and seated fully in the case groove before resealing; a gasket with cracks, loss of elasticity, permanent compression, or displacement should not be treated as serviceable. Citizen Watch states that water-resistant watch gaskets can deteriorate through loss of elasticity, brittleness, and cracking, and Citizen replaces water-resistant gaskets during battery replacement on its watches with user-replaceable batteries. These controls reduce contamination and seating risks during resealing but do not prove restored water resistance.
These controls reduce contamination and seating risks during resealing but do not prove restored water resistance.
Before closing the case, use this checklist to control gasket condition, cleaning, greasing, seating, and seal quality; the reviewed evidence specifies no universal silicone-grease quantity or numerical compression limit for all men's quartz chronograph case-back gaskets, and CASIO advises requesting a water-resistance check when a battery is replaced, so pressure testing remains necessary when the watch's stated water-resistance performance must be verified.
- Inspect: Check the gasket for visible cracks, brittleness, permanent compression, distortion, or displacement. If any of these conditions prevent the gasket from retaining its intended shape or position, use the applicable replacement gasket or professional resealing rather than assuming the existing seal remains suitable.
- Clean: Remove visible dirt and foreign material from the gasket and case groove without damaging either sealing surface. Citizen Watch warns that opening a case back can allow dust to enter and can leave water sealing incomplete, so visible contamination should be removed before closure.
- Grease: Apply silicone grease only when the applicable gasket material and service procedure specify lubrication. The reviewed evidence provides no universal grease thickness, mass, volume, or coating quantity for all quartz chronograph case-back gaskets, so a model-specific service specification takes precedence over an assumed amount.
- Seat: Place the gasket completely in the case groove without visible twisting, pinching, or displacement. If the gasket cannot remain correctly seated, replace the applicable seal or use professional resealing rather than trapping a displaced gasket beneath the case back.
- Close and verify: Refit the case back only after the gasket is correctly seated and the sealing interface is free of visible contamination. CASIO advises requesting a water-resistance check when a battery is replaced; therefore, resealing and gasket care are risk-control steps, while pressure testing is the verification step when restored water-resistance performance must be established.
Gasket Condition and Water-Resistance Limits After Replacement
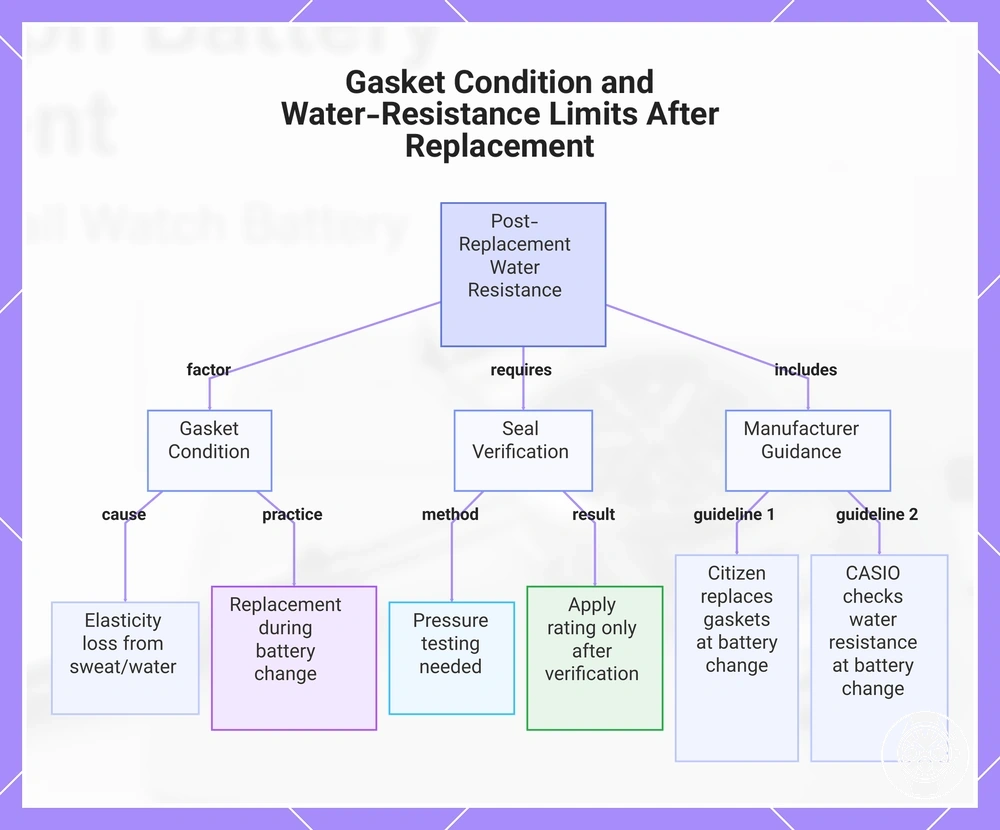
After replacement, a men's quartz chronograph should not be assumed to retain its previous water-resistance limits solely because the case back has been closed: gasket condition and correct seating determine whether the case seal is ready for verification. Citizen Watch states that replaceable-battery watches have their water-resistant gaskets replaced during battery replacement, while CASIO specifies that a trained technician checks water resistance when a battery is replaced. Until the case seal has been checked appropriately, its post-replacement water-resistance performance remains unverified.
Until the case seal has been checked appropriately, its post-replacement water-resistance performance remains unverified.
Gasket condition separates a serviceable sealing interface from one requiring maintenance: Citizen Watch reports that prolonged exposure to sweat and water can cause water-resistant gaskets to lose elasticity, become brittle, or crack, and specifies gasket replacement during battery replacement for its replaceable-battery watches. CASIO gives a model-family maintenance interval of about 2 to 3 years for periodic gasket replacement and requires a water-resistance inspection when the battery is replaced; this 2-to-3-year interval is CASIO guidance, not a universal interval for every quartz chronograph. Correct gasket seating can restore the physical case seal, but seating alone does not measure its resistance to water pressure. Pressure testing or the applicable professional water-resistance check is therefore the verification step when post-replacement performance must be established.
Correct gasket seating can restore the physical case seal, but seating alone does not measure its resistance to water pressure.
For water exposure, sweat, or sport use, apply the watch manufacturer's stated water-resistance category only after the post-replacement seal has been appropriately verified. For example, CASIO's current operating guidance permits swimming for watches marked 5BAR but not for daily-use water-resistant watches with no BAR marking; Citizen likewise classifies WATER RESIST watches at 3 atmospheres for limited everyday exposure and 5-bar models for more frequent water contact and water sports. If the case has been opened and its seal quality has not been verified, arrange the applicable professional check to maintain the watch before relying on its stated rating for the intended water or sport condition.
This chart shows how gasket condition, seal verification, and manufacturer guidance determine water-resistance limits after a battery replacement or case opening.
This chart shows how gasket condition, seal verification, and manufacturer guidance determine water-resistance limits after a battery replacement or case opening.
DIY vs Professional Battery Replacement Cost
DIY battery replacement cost for a men's quartz chronograph is the battery price plus any tools that must be purchased, while professional battery replacement adds labor and can include seal work and pressure testing. There is no reliable universal Australian price for either option because battery type, case access, seal condition, testing scope, and service inclusions differ by watch and provider. The practical cost comparison therefore includes both money spent and the case damage risk retained by the person opening the watch.
The practical cost comparison therefore includes both money spent and the case damage risk retained by the person opening the watch.
Current Australian provider prices give a bounded example rather than a universal rate: Melbourne Watch Repairs lists battery replacement from AUD$66, pressure testing from AUD$66, and a combined battery-and-pressure-test package from AUD$99, while Watch Tech lists battery changes from AUD$49 and a battery change with pressure testing for AUD$135. These figures show why professional labor and pressure testing must be compared by service scope rather than by battery price alone; the listed difference between Watch Tech's starting battery price and its battery-plus-pressure-test service is AUD$86, while Melbourne Watch Repairs lists its combined package AUD$33 above its battery-only starting price. For DIY, no verified universal total applies because the required tools are case-specific and the replacement battery is movement-specific; reusable tools provide repeat-use value only when they remain suitable for later watches. The value trade-off is therefore a one-off professional service cost against the battery-and-tool cost plus the opening, resealing, and testing responsibilities retained by the DIY user.
| Option | Cost driver | Risk trade-off | Best fit |
|---|---|---|---|
| DIY | Battery price plus any required case-specific tools; the reviewed evidence does not establish one universal Australian DIY total. | The user retains case damage risk and the responsibility for correct resealing; without suitable pressure testing, post-replacement water resistance remains unverified. | A user who already owns suitable tools, can identify the correct battery and opening method, and expects enough compatible future replacements to obtain repeat-use value from the tools. |
| Professional | Battery, labor, and the selected service scope. Current examples are Melbourne Watch Repairs from AUD$66 for a battery or AUD$99 with pressure testing, and Watch Tech from AUD$49 for a battery change or AUD$135 with pressure testing. | The service price increases when pressure testing or additional seal work is included, while specialised opening and testing remain with the repair shop. | A one-off replacement, an unfamiliar or difficult case back, a watch where case damage risk is unacceptable, or a watch that requires pressure testing before relying on its water-resistance rating. |
Professional battery replacement becomes the clearer decision threshold when buying tools offers little repeat-use value, secure case opening cannot be achieved with suitable equipment already available, case damage risk is unacceptable, or pressure testing is required after closure. For example, Watch Tech states that a straightforward battery replacement takes approximately 20 minutes while a battery, seal, and water-pressure test can take up to 60 minutes, showing that the higher service cost can represent additional sealing and verification work rather than battery installation alone. If DIY would require unfamiliar tools while still leaving the required case-seal performance unverified, professional service provides the more complete replacement-and-verification scope.
Chronograph Problems After Battery Replacement
Chronograph problems after battery replacement should be diagnosed by symptom rather than attributed automatically to the new battery: a watch that is not working can have an unresolved battery-contact or movement-response condition, incorrect hand alignment can require a movement-specific zero-position procedure, and unresponsive pushers can indicate an operating-state, contact, or movement fault. Citizen's calibre 0520 instructions specify zero positioning when the chronograph second hand does not return to the 0-second position after battery replacement, so post-replacement misalignment can be an adjustment condition rather than evidence that the replacement cell is defective. Group the symptom first as no movement response, incorrect chronograph hand alignment, or failed pusher response.
Group the symptom first as no movement response, incorrect chronograph hand alignment, or failed pusher response.
Safe checks should remain limited to observable or manufacturer-documented conditions: confirm that the new battery is the specified type and correctly seated, confirm that the crown is in the operating position required by the movement, and compare the chronograph hands and pushers with the applicable calibre instructions before attempting a reset. CASIO's Module 5734 guidance states that using a battery type other than the specified type can cause malfunction; Citizen's H50 instructions require crown position 0 for chronograph operation and specify holding the applicable button for 3 seconds to enter chronograph-second-hand correction, while Citizen's B620 instructions use a 2-second hold in their own correction sequence. These model-specific values show why a reset mode from one calibre should not be transferred to another, leaving battery specification, seating, crown state, and documented reset mode as the safe checks.
| Symptom | Likely attribute issue | Safe check | What it means |
|---|---|---|---|
| Watch is not working after the new battery is installed | Battery specification, seating, electrical contact, crown state, or movement response remains unresolved. | Verify the specified battery type, complete seating, and documented crown position without bending contacts or improvising a reset. CASIO Module 5734 identifies an incorrect battery type as a malfunction risk. | If the specified battery is correctly seated and the documented operating state still produces no movement response, the symptom has reached a possible contact or movement fault rather than a confirmed battery fault. |
| Chronograph hands operate but do not return to zero | Chronograph hand alignment or zero position is incorrect. | Use only the calibre-specific alignment procedure. Citizen calibre 0520 requires zero positioning when its chronograph second hand fails to return to the 0-second position after battery replacement. | A responsive but misaligned hand supports checking the documented zero-position procedure; it does not establish that the new battery is defective. |
| Pushers produce no chronograph response while normal timekeeping continues | Chronograph operating state, pusher input, internal contact, or movement function remains unresolved. | Confirm the manufacturer-specified crown and operating state. Citizen H50 requires crown position 0 for chronograph operation. | If timekeeping continues but correctly operated pushers remain unresponsive, the symptom has crossed the safe operating-state check and can indicate a pusher, contact, or movement fault. |
| Chronograph remains abnormal after its documented reset or hand-alignment procedure | Persistent hand-position, pusher, contact, or movement condition remains unresolved. | Repeat only verification steps authorised by the applicable movement instructions; do not substitute another calibre's reset sequence. | Persistent misalignment, pusher failure, or abnormal movement response is an escalation point for professional troubleshooting. |
Persistent hand alignment errors, non-responsive pushers, or a watch that remains not working after the specified battery, seating, operating-state, and manufacturer-documented reset checks mark the boundary of post-replacement triage. Citizen's H50 and B620 procedures illustrate the model dependency numerically: their cited correction sequences use 3-second and 2-second button holds respectively, so the practical next action is to follow the exact calibre documentation rather than infer a universal reset. Persistent chronograph or movement faults belong under broader watch problems and fixes or professional troubleshooting rather than further battery-replacement steps.
Watch Does Not Start With a New Battery
If a watch does not start with a new battery, first verify the battery orientation and specified cell type, then check for a depleted cell, incorrect contact alignment, an unsecured battery clamp, or a displaced plastic isolator. CASIO specifies that using a battery type other than the type listed for the watch can cause malfunction, while Citizen calibre 6850 requires an All Reset after battery replacement. The safe first checks are therefore correct polarity and cell specification, usable battery condition, normal contact and clamp position, correct isolator position, and only the reset procedure documented for that movement.
Keep the no-start diagnosis limited to these checks rather than altering delicate movement parts.
Keep the no-start diagnosis limited to these checks rather than altering delicate movement parts. The reviewed manufacturer evidence does not establish one universal battery orientation, minimum battery voltage, battery-clamp arrangement, plastic-isolator position, or reset sequence for all men's quartz chronographs; these values are movement-specific. For example, Citizen specifies that calibre 6850's post-battery All Reset requires buttons A, B, and C to be held simultaneously for more than 2 seconds, after which releasing them produces a confirmation tone and slight hand movement; this is a calibre-6850 procedure, not a universal reset. If the applicable checks are correct and the stopped watch still shows no movement, a contact or movement fault remains possible and professional troubleshooting is the appropriate escalation.
- Battery orientation: Verify the new battery's polarity against the applicable movement documentation or a reliable record of the original installation. If the required polarity cannot be established, stop rather than assuming a universal plus (+) orientation.
- Depleted cell: Check the replacement cell with a battery-testing method appropriate to its specified chemistry or use another verified cell of the exact specified type. CASIO identifies low battery power as a condition that can produce abnormal operation, including a blank display on applicable modules; if a verified replacement cell gives the same no-start result, continue with the installation checks rather than assuming the first new battery was the cause.
- Contact alignment: Confirm that the battery contacts meet the correctly seated cell in their normal designed positions. A visibly displaced contact or a contact that does not meet the cell normally is an escalation condition rather than a reason to repeatedly reshape it.
- Battery clamp: Confirm that the battery clamp or holder is completely secured in the position specified for the movement. If the cell remains loose or the clamp cannot be secured normally, stop because reliable electrical contact has not been established.
- Plastic isolator: Confirm that the plastic isolator remains in its documented position and has not been displaced during the battery change. Because the reviewed manufacturer evidence does not establish a universal isolator layout across quartz chronograph movements, do not remove or bypass an unidentified isolator to obtain a response.
- Movement response: Perform an All Reset or equivalent battery-change procedure only when the applicable manufacturer documentation requires it; Citizen calibre 6850, for example, specifies its more-than-2-second three-button reset after battery replacement. If the specified cell, battery orientation, contact alignment, battery clamp, plastic isolator, and documented reset state are correct but the watch does not start, the unresolved cause can include an internal movement fault and should be escalated for watch service.
Chronograph Hands or Pushers Do Not Work After Replacement
If the chronograph hands or pushers are not working after battery replacement, check hand zeroing, crown or stem position, battery seating, pusher response, and the movement-specific reset mode before treating the symptom as an internal movement fault. Citizen's calibre 0520 instructions identify a chronograph second hand that does not return to the 0-second position after battery replacement as a condition requiring zero positioning. The local causes therefore separate into incorrect hand zeroing, an incorrect operating position or failed pusher response, incomplete battery seating, or a movement reset required by the specific calibre.
Confirm the specified battery is fully seated before applying any documented movement reset, because an unresolved battery or contact condition can prevent a meaningful function check.
Reset mode is movement-specific rather than universal: Citizen specifies a button hold of at least 3 seconds to enter chronograph-second-hand correction on calibre H50, while calibre B620 uses a 2-second hold in its own correction procedure, so those numerical values must remain calibre-specific. Citizen also specifies crown position 0 for normal H50 chronograph operation; this means an unresponsive pusher should first be tested with that calibre in its documented operating position rather than being classified immediately as a failed contact. Confirm the specified battery is fully seated before applying any documented movement reset, because an unresolved battery or contact condition can prevent a meaningful function check. If the correct operating state, battery seating, hand zeroing, and documented movement reset still leave the chronograph function unresolved, escalate the watch for professional troubleshooting rather than extending the battery replacement into internal movement repair.
- Chronograph hands — zeroing: If the chronograph hands move but do not return to their reference marks, check the calibre-specific hand zeroing procedure. Citizen calibre 0520 explicitly identifies failure of its chronograph second hand to return to 0 seconds after battery replacement as the condition for zero positioning.
- Pushers — contact and response: Put the crown or stem in the documented chronograph operating position and test normal start, stop, and reset response. Citizen H50 specifies crown position 0 for chronograph operation; if timekeeping continues but the pushers remain unresponsive in that position, the pusher input or internal contact remains an unresolved service issue rather than a confirmed battery fault.
- Reset mode — movement reset: Use only the reset or hand-correction procedure specified for the exact movement. Citizen H50 specifies a hold of at least 3 seconds for its chronograph-second-hand correction mode, whereas Citizen B620 specifies 2 seconds in its procedure; the difference shows why one calibre's reset timing should not be transferred to another.
- Movement response — battery seating: Confirm that the specified replacement cell is completely seated and retained in its intended position before judging movement response. CASIO's battery-replacement guidance states that using a battery type other than the type specified for the watch can cause malfunction; if the specified cell is correctly seated and the documented zeroing, operating-position, pusher-response, and movement-reset checks still leave the chronograph not working, professional troubleshooting is the appropriate escalation.